This is a tutorial to build a screenshot API yourself. If you want a managed screenshot API instead of building browser infrastructure, use ScreenshotOne.
In case you don’t want to read the tutorial, feel free to check out the complete result a screenshot API on GitHub.
In this tutorial, we will build a small screenshot API from scratch. It is not a full replacement for a production service like ScreenshotOne, but it shows the main moving parts: request validation, browser rendering, cookie banner handling, full-page screenshots, S3 uploads, Docker, and deployment options.
A few reasons behind this exercise:
-
I want to assess the modern landscape of technologies that enable screenshot rendering and rethink some architectural choices I made for ScreenshotOne.
-
I want to share a practical guide for developers who want to understand how screenshot APIs work under the hood or build their own internal service. If you prefer to buy instead of build, compare the best screenshot APIs.
-
I want to show how much more complex a screenshot API becomes once you move beyond a basic
page.screenshot()call.
It still fascinates me that building a screenshot API is fun, even the second time.
Features
To keep this tutorial from turning into a book, we will implement four core features:
- Full-page screenshots that trigger lazy-loaded images.
- Blocking cookie banners.
- Changing viewport parameters like dimensions and device scale factor.
- Upload screenshots to any S3-compatible storage.
Of course, there are a hundred more features that screenshot APIs have, but these few will be enough for demonstration purposes.
API comes first
In a real product, customer needs and documentation should come first. For this tutorial, I will take a small subset of ScreenshotOne features and reimplement them right away by writing code.
Technologies
I decided to go with:
- Hono—a simple and fast framework for processing HTTP requests.
- OpenAPI specification—for documentation, SDK generation, validation (Hono has a decent middleware for that), and interoperability with modern AI and other systems.
- TypeScript—I am lazy and static typing saves me from overthinking.
- Node.js—it is bullet-proof, battle-tested, and will be with us for years to come. Also, most of the best libraries like Puppeteer and Playwright for working with headless browsers are written for Node.js. Playwright supports many other languages and is worth considering, too.
- LocalStack for running AWS S3 storage locally for playing and testing purposes.
I also have a decent experience with these technologies and that matters a lot. If you are good with Python, consider going with it, Python also can render website screenshots.
API for rendering screenshots
Starting with Hono is as simple as:
npm create hono@latestI chose the Node.js runtime.
Hono combined with Zod is a turbo rocket. Let’s define the request and response schemes in src/schema.ts:
import { z } from "@hono/zod-openapi";
export const ScreenshotOptionsSchema = z.object({ url: z.string().url().openapi({ description: "A website URL.", example: "https://example.com", }), block_cookie_banners: z.boolean().default(true).openapi({ description: "Render clean screenshots.", example: false, }), viewport_width: z.coerce.number().int().min(1).default(1920).openapi({ description: "Change the viewport width.", example: 1920, }), viewport_height: z.coerce.number().int().min(1).default(1080).openapi({ description: "Change the viewport height.", example: 600, }), device_scale_factor: z.coerce.number().int().min(1).default(1).openapi({ description: "Change the device scale factor.", example: 2, }), full_page: z.boolean().default(false).openapi({ description: "Render the full page screenshot.", example: false, }),});
export const ScreenshotResultSchema = z .object({ screenshot_url: z.string().url(), }) .openapi("Screenshot");As you see, I added all the options that reflect the features we are going to build: changing viewport parameters, full-page screenshots, blocking cookie banners, and returning the URL of the rendered screenshot.
Now, see how easy it is to define a route, handle typed requests, and return typed responses:
import { OpenAPIHono } from "@hono/zod-openapi";import { createRoute } from "@hono/zod-openapi";
import { ScreenshotOptionsSchema, ScreenshotResultSchema } from "./schema";
const app = new OpenAPIHono();
app.openapi( createRoute({ method: "get", path: "/screenshot", request: { query: ScreenshotOptionsSchema, }, responses: { 200: { content: { "application/json": { schema: ScreenshotResultSchema, }, }, description: "Rendered screenshot.", }, }, }), (c) => { const screenshotOptions = c.req.valid("query"); console.log(screenshotOptions); // Output: // { // "block_cookie_banners": true, // "viewport_width": 1920, // "viewport_height": 1080, // "device_scale_factor": 1, // "full_page": false // }
const screenshotUrl = "https://example.com";
return c.json({ screenshot_url: screenshotUrl });
// For http://localhost:3000/screenshot, it returns: // {"screenshot_url":"https://example.com"} });
app.doc("/openapi.json", { openapi: "3.0.0", info: { version: "1.0.0", title: "The Screenshot API", },});
export default app;Then I just update the src/index.ts file:
import { serve } from "@hono/node-server";import app from "./app";
const port = 3000;console.log(`Server is running on port ${port}`);
serve({ fetch: app.fetch, port,});And that’s it. The API is ready to handle screenshot rendering requests.
As a bonus, we get the OpenAPI specification automatically at the /openapi.json route:
{ "openapi": "3.0.0", "info": { "version": "1.0.0", "title": "The Screenshot API" }, "components": { "schemas": { "Screenshot": { "type": "object", "properties": { "screenshot_url": { "type": "string", "format": "uri" } }, "required": ["screenshot_url"] } }, "parameters": {} }, "paths": { "/screenshot": { "get": { "parameters": [ { "schema": { "type": "string", "format": "uri", "description": "A website URL.", "example": "https://example.com" }, "required": true, "name": "url", "in": "query" }, { "schema": { "type": "boolean", "default": true, "description": "Render clean screenshots.", "example": false }, "required": true, "name": "block_cookie_banners", "in": "query" }, { "schema": { "type": "integer", "minimum": 1, "default": 1920, "description": "Change the viewport width.", "example": 1920 }, "required": true, "name": "viewport_width", "in": "query" }, { "schema": { "type": "integer", "minimum": 1, "default": 1080, "description": "Change the viewport height.", "example": 600 }, "required": true, "name": "viewport_height", "in": "query" }, { "schema": { "type": "integer", "minimum": 1, "default": 1, "description": "Change the device scale factor.", "example": 2 }, "required": true, "name": "device_scale_factor", "in": "query" }, { "schema": { "type": "boolean", "default": false, "description": "Render the full page screenshot.", "example": false }, "required": true, "name": "full_page", "in": "query" } ], "responses": { "200": { "description": "Render a Screenshot", "content": { "application/json": { "schema": { "$ref": "#/components/schemas/Screenshot" } } } } } } } }}Asynchronous versus synchronous API
This tutorial uses a simple synchronous API method for rendering screenshots. If I were starting a production screenshot API today, I would seriously consider an asynchronous-first API from scratch.
It is much easier to scale and manage resources with asynchronous jobs. But it requires a lot of work upfront: queues, a database, status tracking, webhooks, retries, and more complicated customer integration.
For users, a synchronous API is much easier to start with. But you can still encourage asynchronous usage when it matters, for example by making asynchronous requests cheaper or charging fewer credits for them.
Unfortunately, building the asynchronous API is out of the scope of this tutorial.
Now, let’s proceed to the most fun part (at least for me)—rendering screenshots.
Rendering screenshots
One simple function to render screenshots
To make sure we are now focused on building only the core features, let’s introduce a simple function in src/screenshots.ts:
import { ScreenshotOptions } from "./schema";
export async function render(options: ScreenshotOptions): Promise<{ url: string }> { // return the URL of the screenshot
return { url: "https://example.com" };}It requires new type introduced as in src/schema.ts:
export const ScreenshotOptionsSchema = z.object({ url: z.string().url().openapi({ description: "A website URL.", example: "https://example.com", }), // ...});
export type ScreenshotOptions = z.infer<typeof ScreenshotOptionsSchema>;And let’s use it in the route handler (src/app.ts):
// ...import { render } from "./screenshots";
app.openapi( createRoute({ // ... }), async (c) => { const screenshotOptions = c.req.valid("query");
const result = await render(screenshotOptions);
return c.json({ screenshot_url: result.url }); });Now, we can fully focus on implementing rendering.
Preferring Puppeteer to Playwright
Playwright seems to be a superior library for working with headless browsers than Puppeteer, but I will go with Puppeteer.
Playwright is focused more on automation testing, while Puppeteer is about browser automation. Puppeteer is still actively developed and has a much better ecosystem in terms of plugs you can use for screenshotting, like blocking ads, cookie banners, and much much more.
Long story short, These are libraries designed with different goals and they suit different needs. If you are interested read more about the differences and similarities between Puppeteer and Playwright.
And, frankly, I have plenty of experience with Puppeteer—it is a decent library that just does the job.
If you are curious, you can read more about how to take screenshots with Puppeteer.
Now, let’s install Puppeteer:
npm i puppeteerAnd try to render our first screenshot.
The first screenshot
In the first simple implementation, we omit blocking banners and scrolling before rendering the full page and uploading it to any S3-compatible storage. But everything else is fairly easy to implement:
import { ScreenshotOptions } from "./schema";
import puppeteer from "puppeteer";
export async function render(options: ScreenshotOptions): Promise<{ url: string }> { const browser = await puppeteer.launch();
const page = await browser.newPage(); await page.setViewport({ width: options.viewport_width, height: options.viewport_height, deviceScaleFactor: options.device_scale_factor, });
await page.goto(options.url);
const encodedScreenshot = await page.screenshot({ type: "jpeg", encoding: "base64", fullPage: options.full_page, });
await browser.close();
return { url: `data:image/jpeg;base64,${encodedScreenshot}` };}I went with the JPEG format, since it is more performant and returned the image in the Base64 encoding for simplicity but in the data URL format.
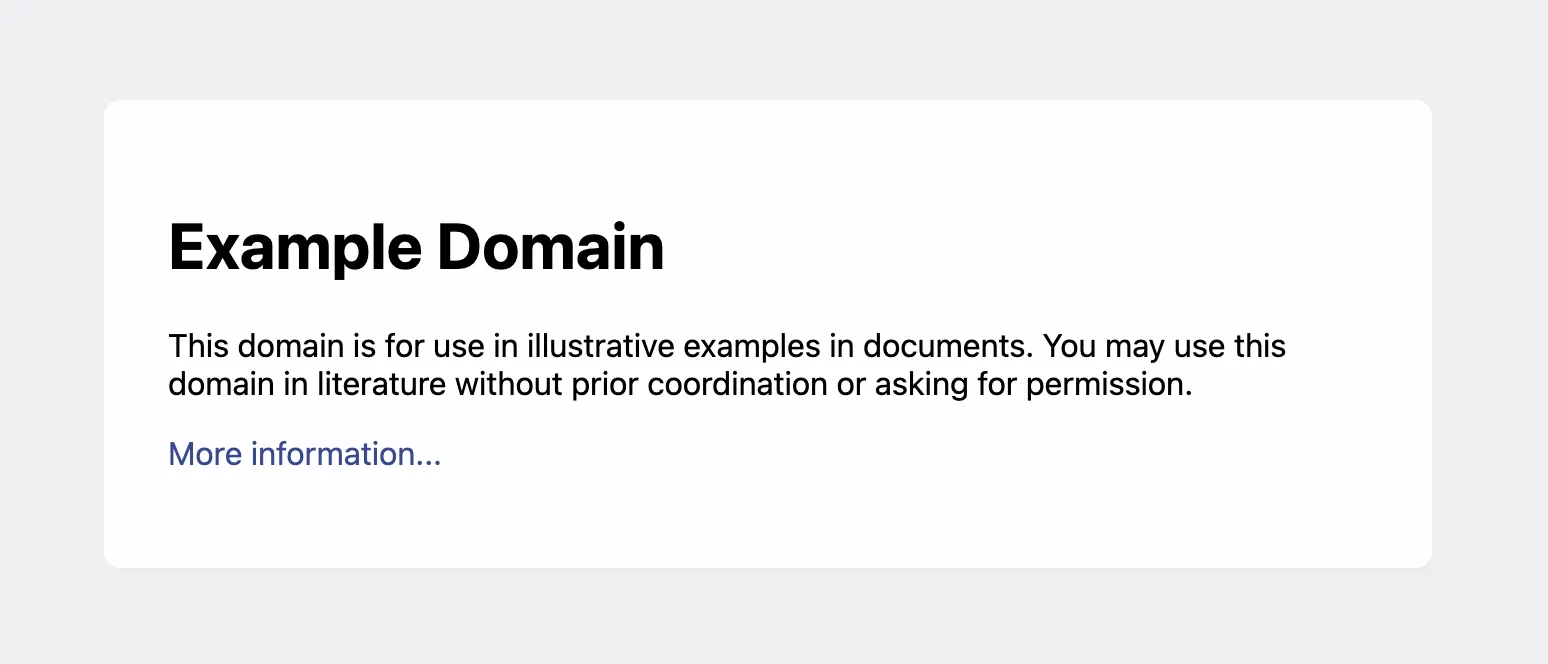
If you request to render the example.com website as:
curl "http://localhost:3000/screenshot?url=https://example.com"You will get a response as:
{ "screenshot_url": "data:image/jpeg;base64,/9j/4AAQSkZJRgABAQ..." }You can copy and paste the URL into the browser and you will see the screenshot:
Block cookie banners
We won’t implement the complete solution to block cookies with Puppeteer, but we will one simple solution to demonstrate how it can be done—by using a plugin to block banners.
Let’s install and use the plugin first:
npm install @cliqz/adblocker-puppeteer cross-fetchIntegrating the plugin takes only a few lines of code:
import { ScreenshotOptions } from "./schema";
import puppeteer, { Page } from "puppeteer";import { PuppeteerBlocker } from "@cliqz/adblocker-puppeteer";import fetch from "cross-fetch";
let blocker: PuppeteerBlocker | null = null;async function blockCookieBanners(page: Page) { if (!blocker) { blocker = await PuppeteerBlocker.fromLists(fetch, [ // the list of the cookie banners to block from the https://easylist.to/ website "https://secure.fanboy.co.nz/fanboy-cookiemonster.txt", ]); }
await blocker.enableBlockingInPage(page);}
export async function render(options: ScreenshotOptions): Promise<{ url: string }> { const browser = await puppeteer.launch();
const page = await browser.newPage(); if (options.block_cookie_banners) { await blockCookieBanners(page); }
await page.setViewport({ width: options.viewport_width, height: options.viewport_height, deviceScaleFactor: options.device_scale_factor, });
await page.goto(options.url);
const encodedScreenshot = await page.screenshot({ type: "jpeg", encoding: "base64", fullPage: options.full_page, });
await browser.close();
return { url: `data:image/jpeg;base64,${encodedScreenshot}` };}Now, let’s try and check if it blocks the cookie banners for StackOverflow. First without banners:
curl http://localhost:3000/screenshot?url=https://stackoverflow.com/&block_cookie_banners=falseAnd the result is:
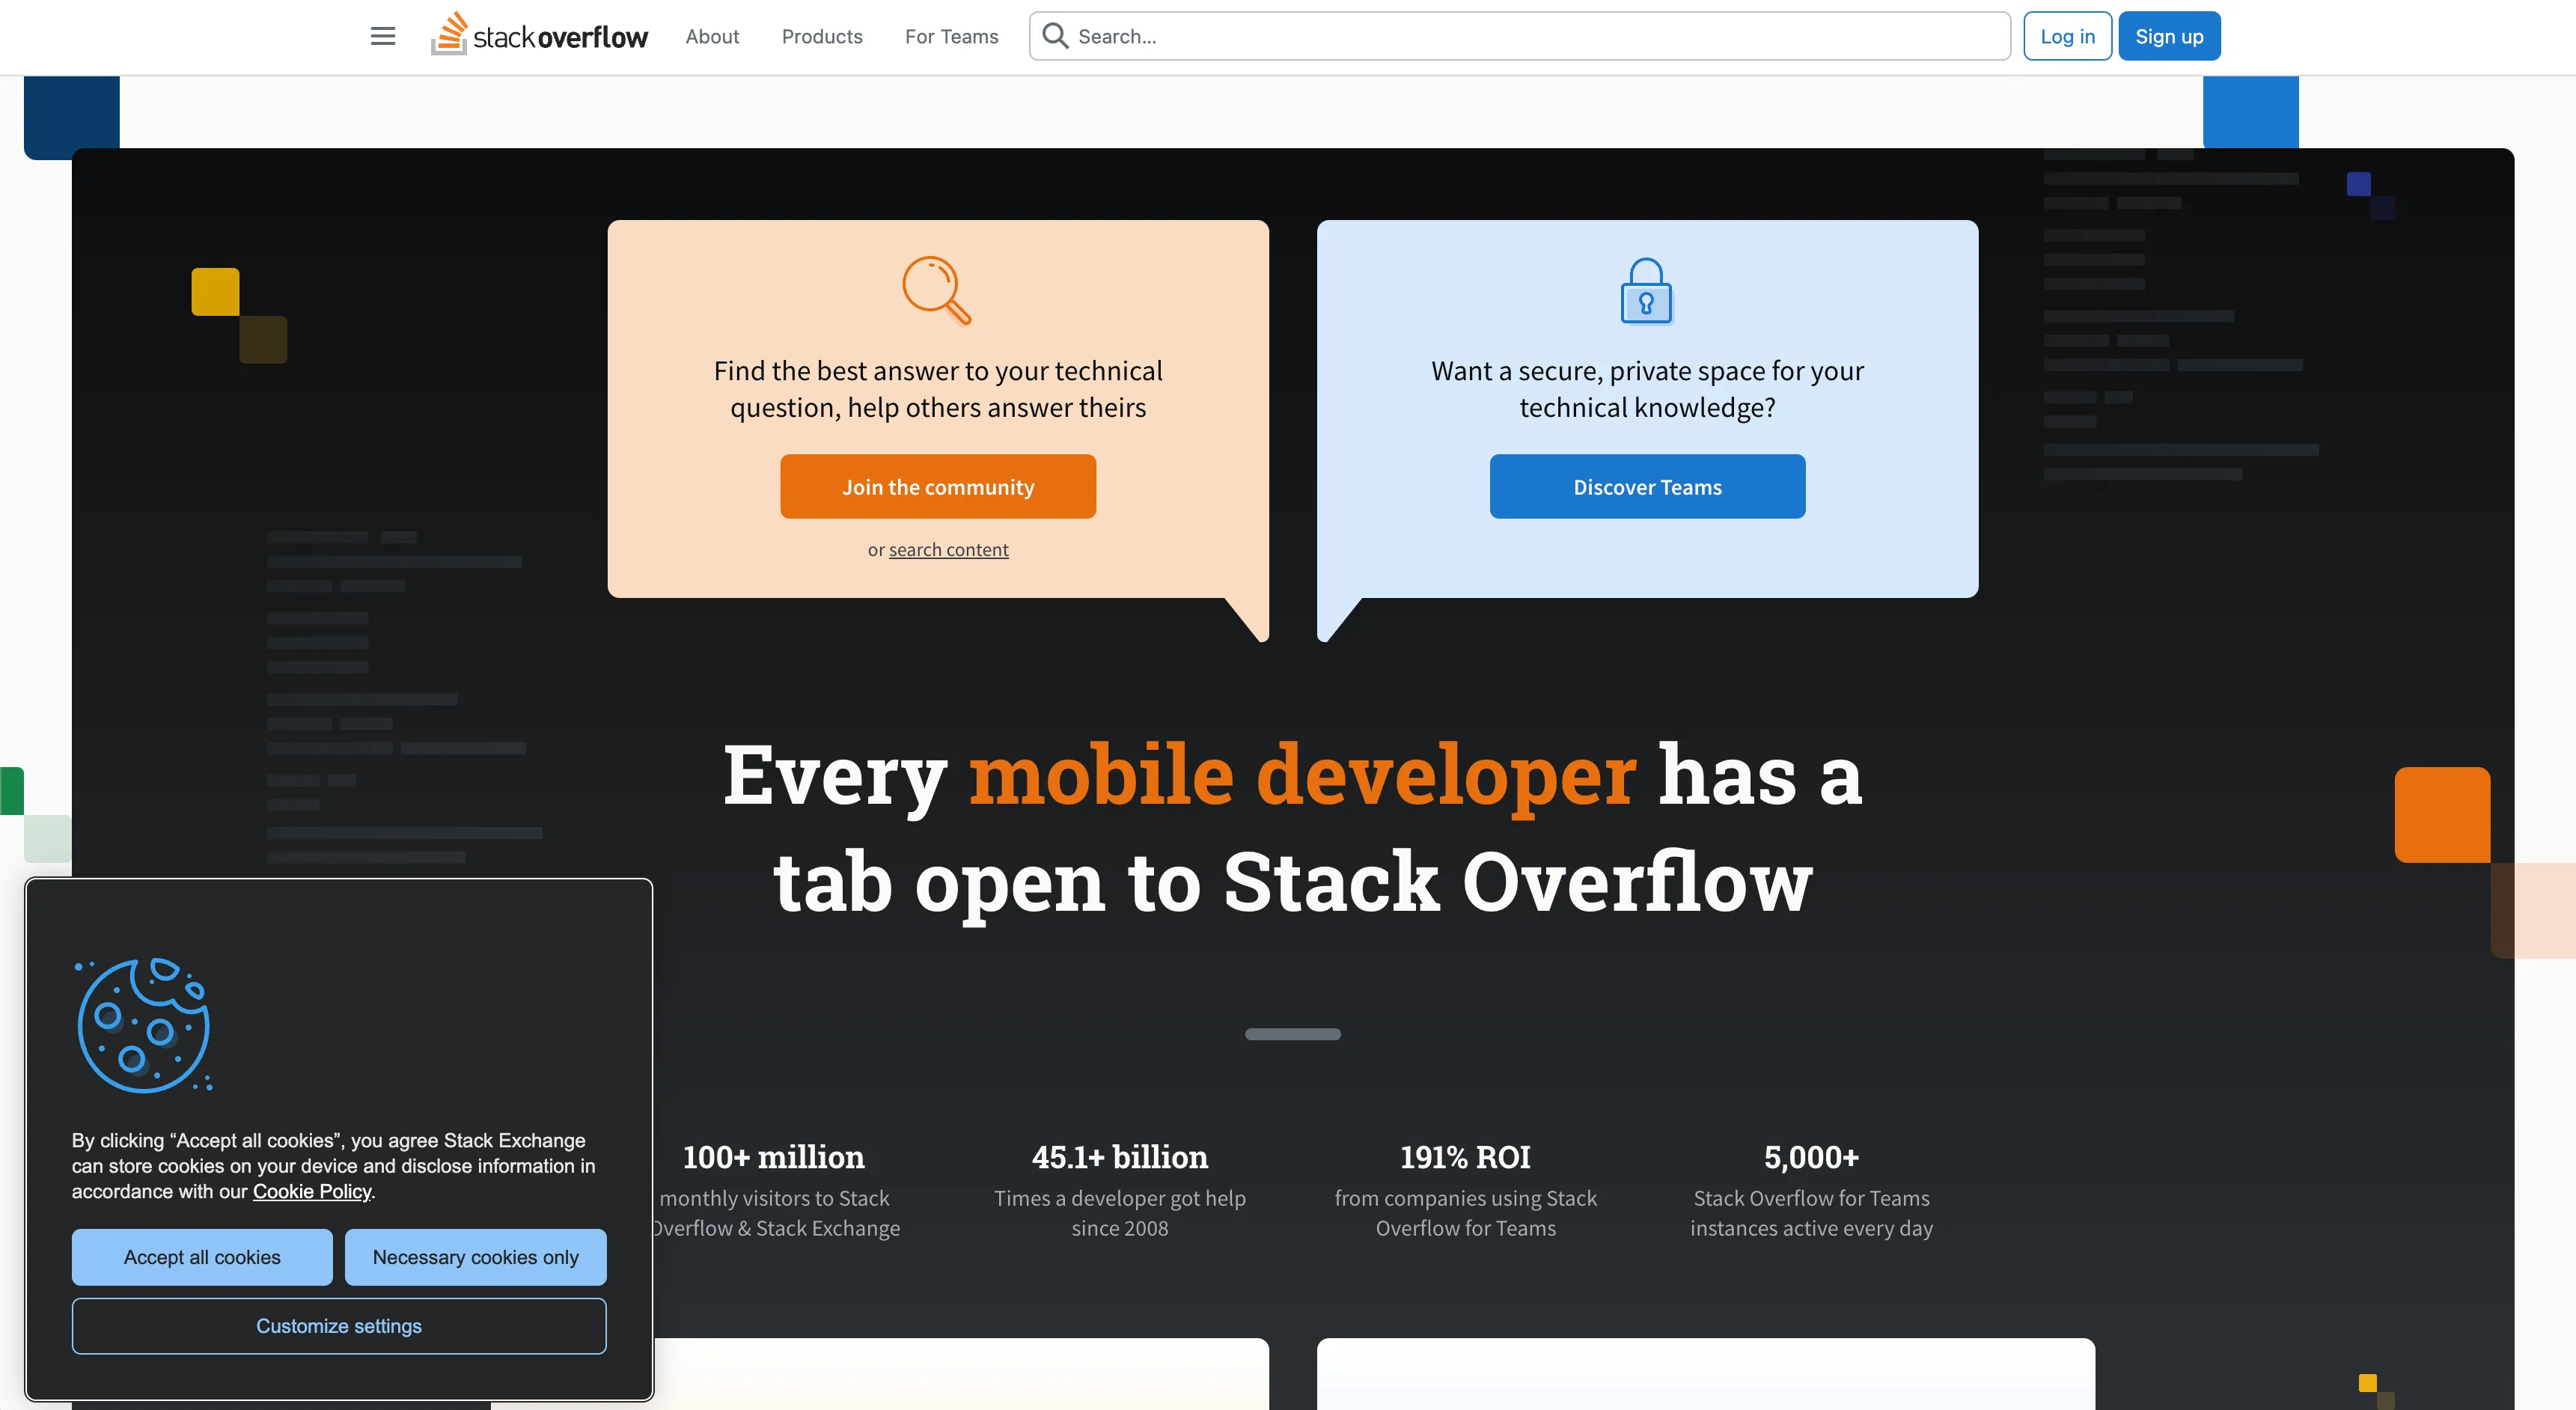
And now, without:
curl http://localhost:3000/screenshot?url=https://stackoverflow.com/&block_cookie_banners=trueAnd:
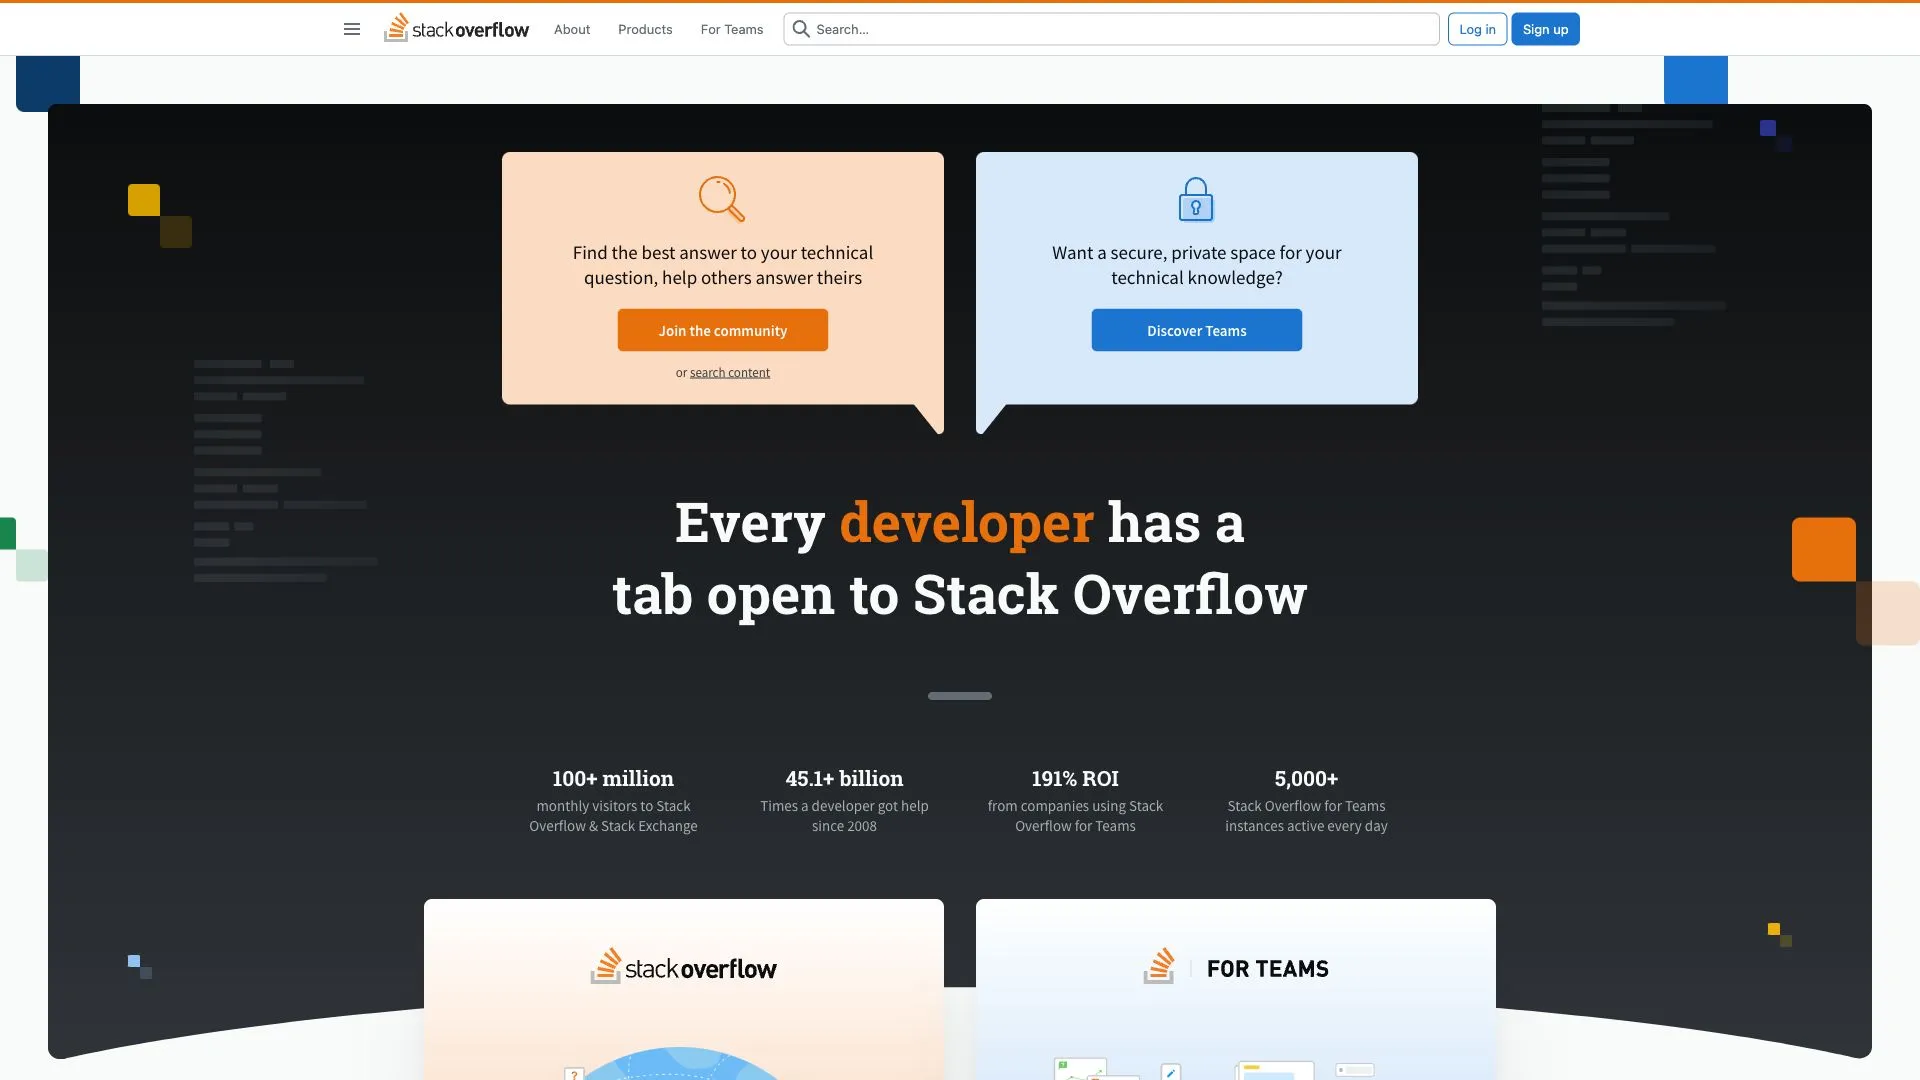
But there are many corner cases where cookie banner blocking won’t work. In this case, you will need to block them by selectors and develop many other heuristics that search for “accept cookie” in buttons and similar.
It took me years to develop a sophisticated algorithm that blocks most cookie banners in ScreenshotOne.
Trigger lazy loading for full-page screenshots
Most websites don’t render images below the fold immediately. They use lazy loading to speed up the initial page load.
That causes problems when taking full-page screenshots. The fastest way to fix it is to scroll to the bottom of the page before taking the full-page screenshot.
For example, look at this Apple full-page screenshot without scrolling:
And then we add scrolling:
// ...
async function scroll(page: Page) { return await page.evaluate(async () => { return await new Promise((resolve, reject) => { var i = setInterval(() => { window.scrollBy(0, window.innerHeight); if ( document.scrollingElement && document.scrollingElement.scrollTop + window.innerHeight >= document.scrollingElement.scrollHeight ) { window.scrollTo(0, 0); clearInterval(i); resolve(null); } }, 100); }); });}
//...
export async function render(options: ScreenshotOptions): Promise<{ url: string }> { // ... await page.goto(options.url);
if (options.full_page) { await scroll(page); }
const encodedScreenshot = await page.screenshot({ type: "jpeg", encoding: "base64", fullPage: options.full_page, });
// ...}
//...Now, look at the result:
All images are loaded and the full-page screenshot is rendered properly.
If you are curious, read more about how to take full-page screenshots with Puppeteer.
Uploading to S3 storage
Later you can use any S3 compatible storage because the code I write will still work, but for testing purposes on my local machine, I will use LocalStack:
python3 -m pip install localstackAnd start it:
localstack start -dConfigure your AWS CLI (set access/secret keys to “test”):
aws configure --profile localstackCreate your bucket:
aws s3 mb s3://screenshots --endpoint-url http://localhost:4566 --profile localstackInstall the AWS SDK for JavaScript:
npm install @aws-sdk/client-s3 @aws-sdk/lib-storageNow, let’s try to upload screenshots to the bucket:
import { CompleteMultipartUploadCommandOutput, S3Client, S3ClientConfig } from "@aws-sdk/client-s3";import { Upload } from "@aws-sdk/lib-storage";
// ...
const cfg: S3ClientConfig = { region: process.env.S3_REGION ?? "us-west-2", maxAttempts: 5, retryMode: "standard", credentials: { accessKeyId: process.env.ACCESS_KEY_ID ?? "test", secretAccessKey: process.env.SECRET_ACCESS_KEY ?? "test", }, endpoint: process.env.S3_ENDPOINT ?? "http://localhost:4566", forcePathStyle: true,};
const client = new S3Client(cfg);
export async function uploadToS3Storage(screenshot: Buffer, key: string, contentType: string) { const bucket = "screenshots";
const upload = new Upload({ client: client, params: { Bucket: bucket, Key: key, Body: screenshot, ContentType: contentType, StorageClass: "STANDARD", }, queueSize: 4, partSize: 1024 * 1024 * 5, leavePartsOnError: false, });
const result: CompleteMultipartUploadCommandOutput = await upload.done(); if (!result.Location) { throw new Error("Failed to upload"); }
return result.Location;}
export async function render(options: ScreenshotOptions): Promise<{ url: string }> { // ...
const location = await uploadToS3Storage(screenshot, "example.jpeg", "image/jpeg");
return { url: location };}The result URL will be just http://localhost/screenshots/example.jpeg which is not correct, since it doesn’t contain the port.
As an exercise, you can fix that and also add a parameter to specify the resulting filename or compute it automatically from the website URL.
Containerize
Since we went with Puppeteer, it already provides instructions on how to build a Docker and run a headless browser with Node.js:
FROM node:20@sha256:cb7cd40ba6483f37f791e1aace576df449fc5f75332c19ff59e2c6064797160e
# Install latest chrome dev package and fonts# to support major charsets (Chinese, Japanese, Arabic, Hebrew, Thai and a few others)# Note: this installs the necessary libs to make the bundled version of Chrome that Puppeteer# installs, work.RUN apt-get update \ && apt-get install -y wget gnupg \ && wget -q -O - https://dl-ssl.google.com/linux/linux_signing_key.pub | gpg --dearmor -o /usr/share/keyrings/googlechrome-linux-keyring.gpg \ && sh -c 'echo "deb [arch=amd64 signed-by=/usr/share/keyrings/googlechrome-linux-keyring.gpg] https://dl-ssl.google.com/linux/chrome/deb/ stable main" >> /etc/apt/sources.list.d/google.list' \ && apt-get update \ && apt-get install -y google-chrome-stable fonts-ipafont-gothic fonts-wqy-zenhei fonts-thai-tlwg fonts-khmeros fonts-kacst fonts-freefont-ttf libxss1 dbus dbus-x11 \ --no-install-recommends \ && service dbus start \ && rm -rf /var/lib/apt/lists/* \ && groupadd -r apiuser && useradd -rm -g apiuser -G audio,video apiuser
USER apiuser
WORKDIR /home/apiuser/app
COPY --chown=apiuser:apiuser package*json tsconfig.json ./COPY --chown=apiuser:apiuser src ./src
RUN npm ci && \ npm run build && \ npm prune --production
CMD ["node", "/home/apiuser/app/build/index.js"]I also changed the TypeScript configuration (tsconfig.json):
{ "compilerOptions": { "target": "ESNext", "strict": true, "module": "commonjs", "esModuleInterop": true, "types": ["node"], "outDir": "./build" }, "exclude": ["node_modules"], "include": ["**/*.ts"]}Then I installed the TypeScript compiler:
npm i typescript --save-devI updated the scripts section in package.json:
{ // ... "scripts": { "dev": "tsx watch src/index.ts", "build": "tsc" } // ...}And tuned a bit the configuration of the browser when launching:
const browser = await puppeteer.launch({ args: [ "--disable-setuid-sandbox", "--disable-dev-shm-usage", "--disable-accelerated-2d-canvas", "--no-first-run", "--single-process", "--disable-gpu", ], headless: true,});Now, let’s check that it works:
docker build -t learnshot .And:
docker run -p 3000:3000 learnshot -e S3_ENDPOINT=... -e ACCESS_KEY_ID=... # and other S3-related environment variablesUsing the local version of S3 will not work with Docker out of the box. You can either use a real S3 bucket or make localhost available inside Docker’s internal network.
It should work and respond as before.
Containerizing the application will allow us to host the API anywhere from serverless to VPS.
Deploy
For ScreenshotOne, I use a combination of bare metal servers with GPU, managed Kubernetes, and Google Cloud Run.
But there are one thousand more ways to deploy the screenshot API we have just built.
Kubernetes
It has a lot of advantages and I enjoy using it. Some of them are:
- Scalability: It can automatically adjust resources based on demand.
- Flexibility: It supports a wide range of environments, including on-premises, cloud, and hybrid clouds.
- Rich and strong ecosystem: Offers a rich set of features and integrations thanks to its widespread adoption and active community.
But it also has two serious downsides:
- Complexity: Setting up and managing a Kubernetes cluster can be complex, requiring significant expertise. Start with the managed option first. Even that will be complex most of the time.
- Cost: While Kubernetes itself is open-source and free, running it, especially in cloud environments, can incur substantial costs based on the resources utilized. But I consider it a much cheaper alternative to Google Cloud Run and AWS Fargate at scale.
I wouldn’t start with Kubernetes today in most cases, but at later stages of a project, it can be irreplaceable and valuable.
AWS Fargate, Google Cloud Run, or Azure Container
I use Google Cloud Run and still believe it is one of the easiest and fastest options to start with. Typical advantages of such platforms are:
- Serverless-style deployment: these environments remove the need to manage servers or clusters, simplifying deployment and management.
- Scalability: Automatically scales computing capacity in response to application demands.
- Integration: Seamlessly integrates with other Google Cloud, AWS, or Azure services, offering a comprehensive ecosystem for deployment, monitoring, and security.
The main downside for me is cost, it is expensive for long-running and resource-intensive applications (like headless browsers!) due to its pricing model.
VPS
Virtual Private Servers (VPS) provide another viable option for deploying our screenshot API. And that’s how I actually started, but it quickly gets out of control, once you have a considerable load, you need to always adjust and check the capacity of your servers.
The main upside is cost-effectiveness, but managing VPS is still painful which can be solved with PaaS like Heroku, Render, or similar.
Or you can use Kamal and GitHub Actions to automate at least deployments, but you will still have infrastructure issues to solve.
PaaS
Heroku and similar providers can simplify the server management issues, but you can use something much better that can combine both cost efficiency and ease of deployment—Coolify:
It can automate your CI/CD process, generate SSL certificates, provision servers, and has powerful server automation and monitoring.
If I were starting today again, I would seriously consider using Coolify and provisioning and managing my own servers with it.
What is next?
You might want to continue further development, but there is so much more about screenshot APIs. Let’s grasp quickly what could be done next.
Caching
Except for specific categories of sites like news, most sites don’t change frequently and you can enable caching for rendered screenshots.
For example, ScreenshotOne does that by utilizing Cloudflare Workers, Cache, and R2 storage. It is also provided as a free option for all ScreenshotOne customers since it almost costs nothing.
Proxies and retries
Requests to websites often fail. Networks fail, pages time out, and sometimes your screenshot request is blocked.
Combine using proxies and retry requests if the site does not respond.
Advanced image processing
You can add a feature to specify the image size, and format and convert it on the fly.
It is not requested frequently but is used by some of my customers to store already processed images and serve them from the cache.
There are a lot more features to build but I listed the most frequently asked features.
Improve error handling
Make sure to handle all the possible errors from Puppeteer and when uploading screenshots to the S3 storage.
Also, for every function you can call, always set timeouts and make sure to handle them properly if the function call exceeds the configured timeout.
Automate testing
Screenshotting websites have so many pitfalls that I would recommend to write automation tests if it is possible.
You often fix one thing, and two others break. Writing automated tests can help prevent that and keep screenshot quality stable.
The end
I know that screenshot APIs are boring, that’s what most developers tell me. But I hope I shared a little bit of my passion for this domain with you and you learned a thing or two.
Thanks for reading!