Product tours break quietly. Someone renames a button, moves a menu item or adds a sticky header, and the onboarding tour that greets every new user now points at nothing. No error is thrown, the tests stay green, and you find out from a confused customer, if at all.
I wanted a test that fails when a tour step looks wrong, not only when it crashes. So I built a small dashboard with a Driver.js tour, wrote Playwright tests that screenshot every step, and then broke the app in two realistic ways to see what the tests catch.
All the code is in screenshotone/blog-examples. Clone it and run npm test to follow along.
What I tested with
I ran everything on November 6, 2026 on macOS with Playwright 1.65.0, Chrome Headless Shell 158.0.8127.18, Driver.js 1.10.2, TypeScript 7.0.2 and Node.js 24. The viewport was 1280 × 800 at a device scale factor of 2, so every screenshot is 2560 × 1600.
The app and the tour
The demo app is a dashboard called Lumen. It has a sidebar, a search field, a few stats and a five-step tour:
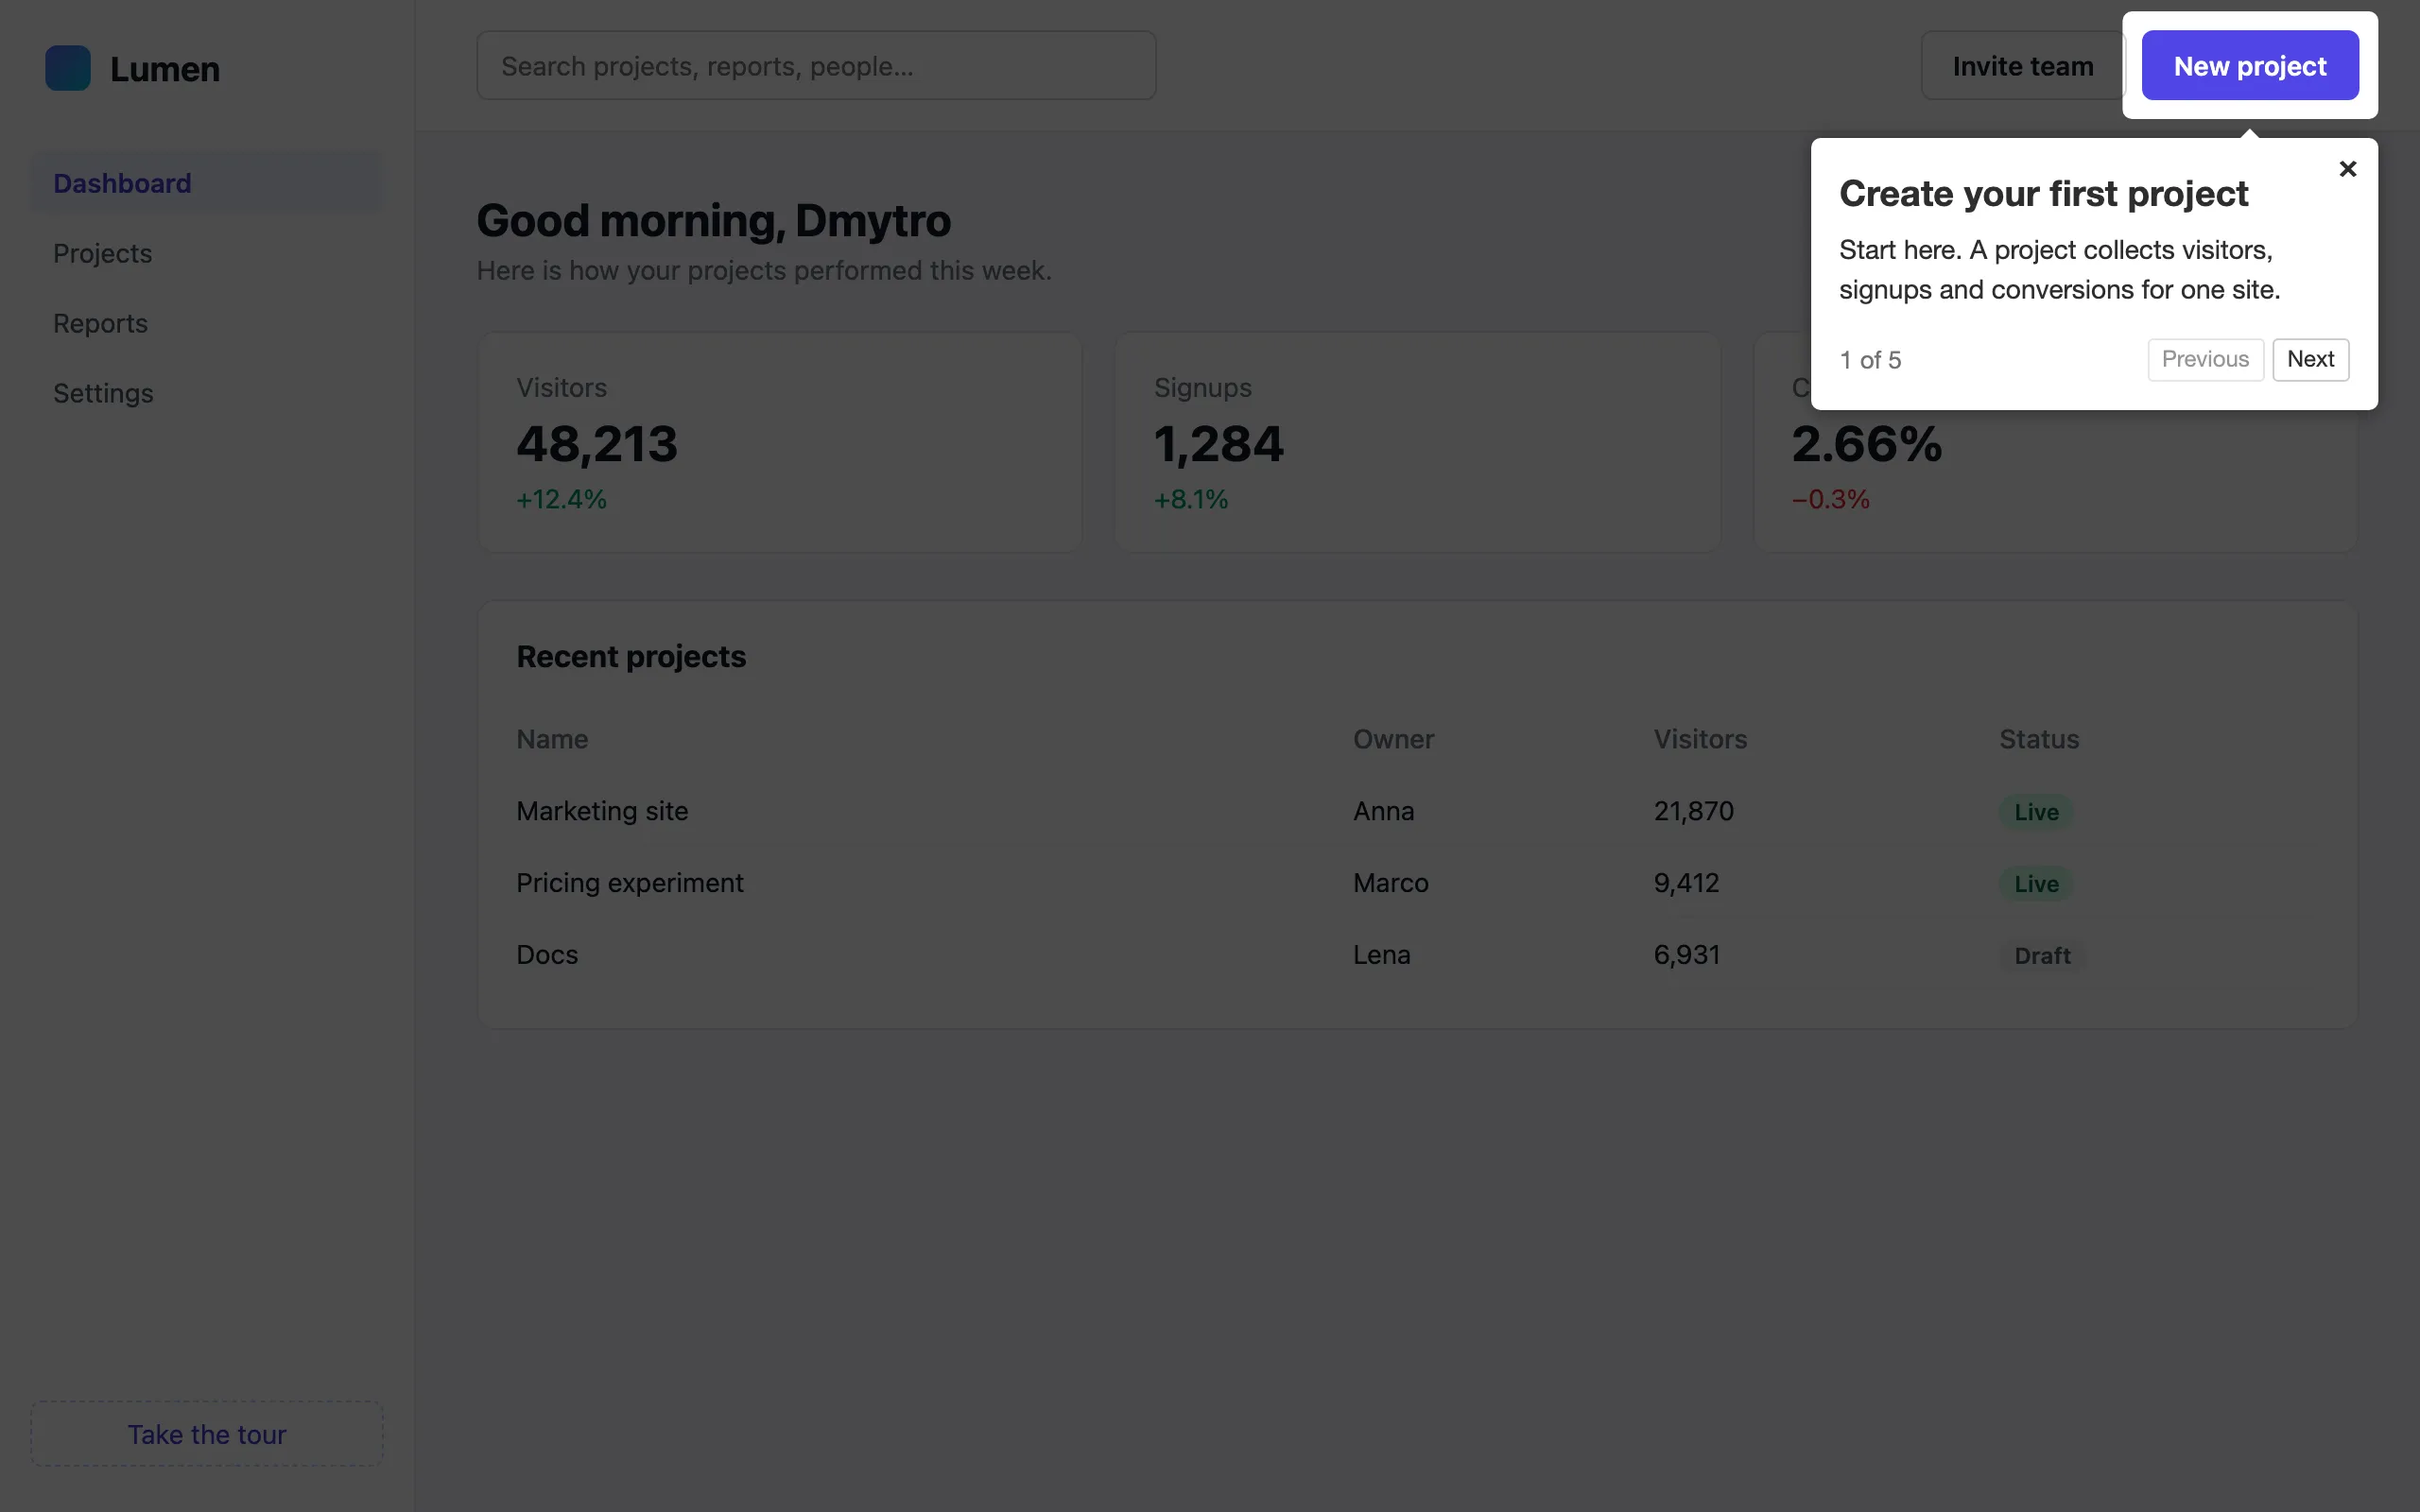
I keep the tour in a JSON file instead of hardcoding it in JavaScript. The app and the tests read the same file, so a test always checks the steps your users see:
{ "showProgress": true, "steps": [ { "element": "#new-project", "popover": { "title": "Create your first project", "description": "Start here. A project collects visitors, signups and conversions for one site.", "side": "bottom", "align": "end" } }, { "element": "#search", "popover": { "title": "Find anything", "description": "Search across projects, reports and teammates.", "side": "bottom", "align": "start" } } ]}The real file has three more steps: the stats, the Reports link and the Invite team button.
The app exposes one small function, window.startTour(). It starts the tour at any step, so a test for step 4 doesn’t have to click Next three times first:
import type { Config, Driver, driver as createDriver } from "driver.js";
declare global { interface Window { // The Driver.js IIFE build loaded with a <script> tag. driver: { js: { driver: typeof createDriver } }; // Set by the ScreenshotOne script, which inlines the tour config. TOUR_CONFIG?: Config; startTour: (stepIndex?: number, overrides?: Config) => Promise<void>; tour?: Driver; }}
const { driver } = window.driver.js;
async function loadTourConfig(): Promise<Config> { if (window.TOUR_CONFIG) { return window.TOUR_CONFIG; }
const response = await fetch("/tour.json"); return response.json();}
window.startTour = async (stepIndex = 0, overrides = {}) => { const config = await loadTourConfig(); const tour = driver({ ...config, ...overrides }); tour.drive(stepIndex); window.tour = tour;};The overrides argument lets the tests turn off Driver.js animations. I’ll come back to window.TOUR_CONFIG in the ScreenshotOne section.
The whole example is in TypeScript. The import type only brings in Driver.js types, so tsc compiles app/app.ts to plain JavaScript that uses the Driver.js build from the <script> tag. The test server and the ScreenshotOne script are .ts files too, and Node.js 22.18 or newer runs them directly.
The Playwright tests
The test file reads the same tour.json and creates one test per step. Each test does three things:
- Checks that the step’s selector matches exactly one visible element. Driver.js highlights the first match, so two matches are a bug too.
- Starts the tour at that step and checks the popover title.
- Compares a screenshot of the whole page with the baseline.
import { readFileSync } from "node:fs";import { test, expect } from "@playwright/test";
type TourStep = { element: string; popover: { title: string; description: string };};
const tour: { steps: TourStep[] } = JSON.parse( readFileSync(new URL("../app/tour.json", import.meta.url), "utf-8"));
declare global { interface Window { startTour: (stepIndex?: number, overrides?: object) => Promise<void>; }}
for (const [index, step] of tour.steps.entries()) { const name = `step ${index + 1}: ${step.popover.title}`;
test(name, async ({ page }) => { await page.goto("/");
// Driver.js highlights the first match, so the selector must match exactly one visible element. const target = page.locator(step.element); await expect(target, `"${step.element}" must match one element`).toHaveCount(1); await expect(target).toBeVisible();
await page.evaluate((i) => window.startTour(i, { animate: false }), index);
const popover = page.locator(".driver-popover"); await expect(popover).toBeVisible(); await expect(popover.locator(".driver-popover-title")).toHaveText(step.popover.title);
await expect(page).toHaveScreenshot(`step-${index + 1}.png`); });}I also added one test that clicks through the whole tour like a user would:
test("the tour can be completed with the Next button", async ({ page }) => { await page.goto("/"); await page.getByRole("button", { name: "Take the tour" }).click();
const popover = page.locator(".driver-popover"); for (const step of tour.steps) { await expect(popover.locator(".driver-popover-title")).toHaveText(step.popover.title); await popover.locator(".driver-popover-next-btn").click(); }
await expect(popover).toBeHidden();});In playwright.config.ts, Playwright builds and starts the demo app before the tests. A few settings matter for the screenshots:
deviceScaleFactor: 2renders the page like a Retina screen, andscale: "device"keeps that resolution in the screenshot. Playwright scales screenshots down to CSS pixels by default, so without it you get blurry 1280 × 800 images instead of sharp 2560 × 1600 ones.- Playwright names each baseline after the screenshot, the project and the operating system, like
step-1-desktop-darwin.png.darwinmeans macOS. On Linux, the same test looks forstep-1-desktop-linux.png, so each OS keeps its own baselines. animations: "disabled"andmaxDiffPixelRatiokeep the comparison stable. More on that below.
import { defineConfig, devices } from "@playwright/test";
export default defineConfig({ testDir: "./tests", reporter: [["list"], ["html", { open: "never" }]], use: { baseURL: "http://localhost:3000", }, expect: { toHaveScreenshot: { // Allow tiny anti-aliasing differences, catch real layout changes. maxDiffPixelRatio: 0.01, animations: "disabled", // Keep the full 2x resolution instead of scaling down to CSS pixels. scale: "device", }, }, projects: [ { name: "desktop", use: { ...devices["Desktop Chrome"], viewport: { width: 1280, height: 800 }, // Render at 2x, like a Retina screen, so the screenshots are sharp. deviceScaleFactor: 2, }, }, ], webServer: { command: "npm start", // builds app/app.ts and starts server.ts url: "http://localhost:3000", reuseExistingServer: !process.env.CI, },});The first run creates the baselines
There is nothing to compare with on the first run, so the five screenshot tests fail on purpose and Playwright saves what it rendered:
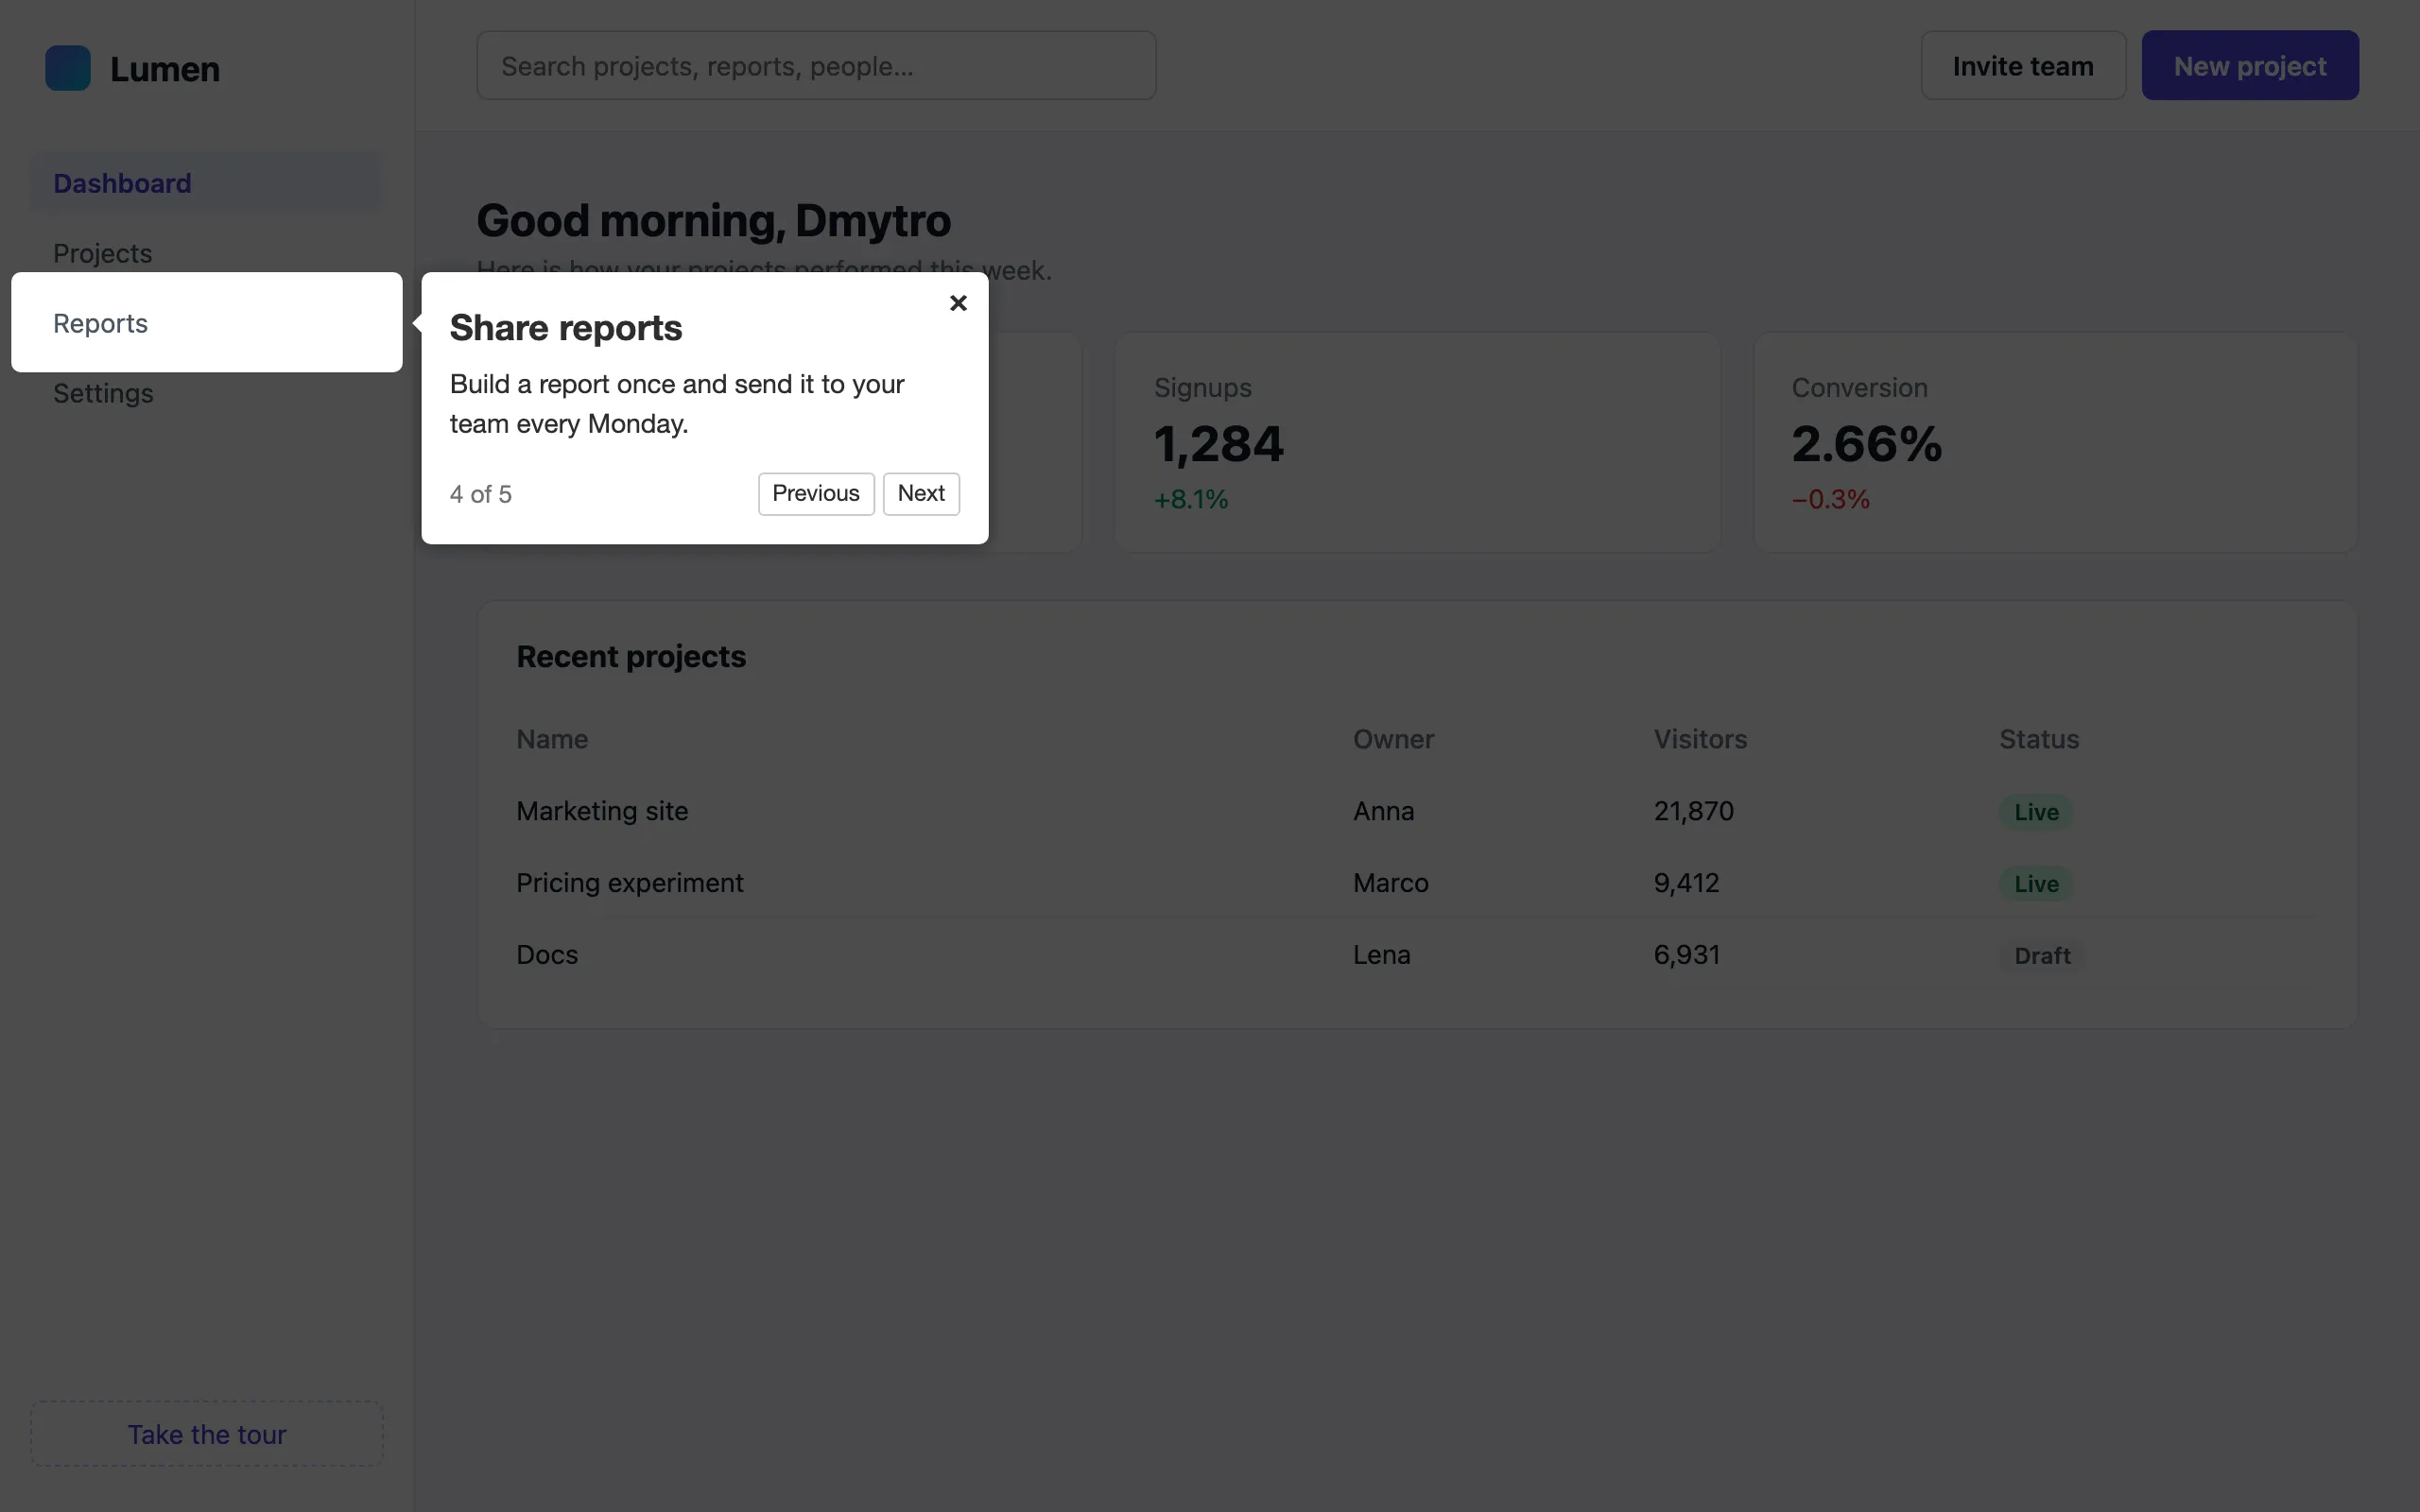
Error: A snapshot doesn't exist at .../tests/tour.spec.ts-snapshots/step-5-desktop-darwin.png, writing actual.... 5 failed 1 passedI looked at every image before going further. That review is the important part: a baseline is only useful if it shows the tour the way you want it. Here is step 4, with the popover to the right of the Reports link:
From then on, every run compares against those images:
Running 6 tests using 1 worker
✓ 1 [desktop] › tests/tour.spec.ts:22:5 › step 1: Create your first project (221ms) ✓ 2 [desktop] › tests/tour.spec.ts:22:5 › step 2: Find anything (152ms) ✓ 3 [desktop] › tests/tour.spec.ts:22:5 › step 3: Your key numbers (151ms) ✓ 4 [desktop] › tests/tour.spec.ts:22:5 › step 4: Share reports (147ms) ✓ 5 [desktop] › tests/tour.spec.ts:22:5 › step 5: Invite your team (154ms) ✓ 6 [desktop] › tests/tour.spec.ts:40:1 › the tour can be completed with the Next button (352ms)
6 passed (1.8s)I ran it a few more times to make sure the screenshots didn’t change between runs. They didn’t.
Break 1: someone renames a button
The first change is the most common one. A developer renames id="new-project" to id="create-project" during a refactor. The tour config still points at #new-project.
Driver.js doesn’t throw an error when the element is missing. It shows the popover in the middle of the screen and highlights nothing:
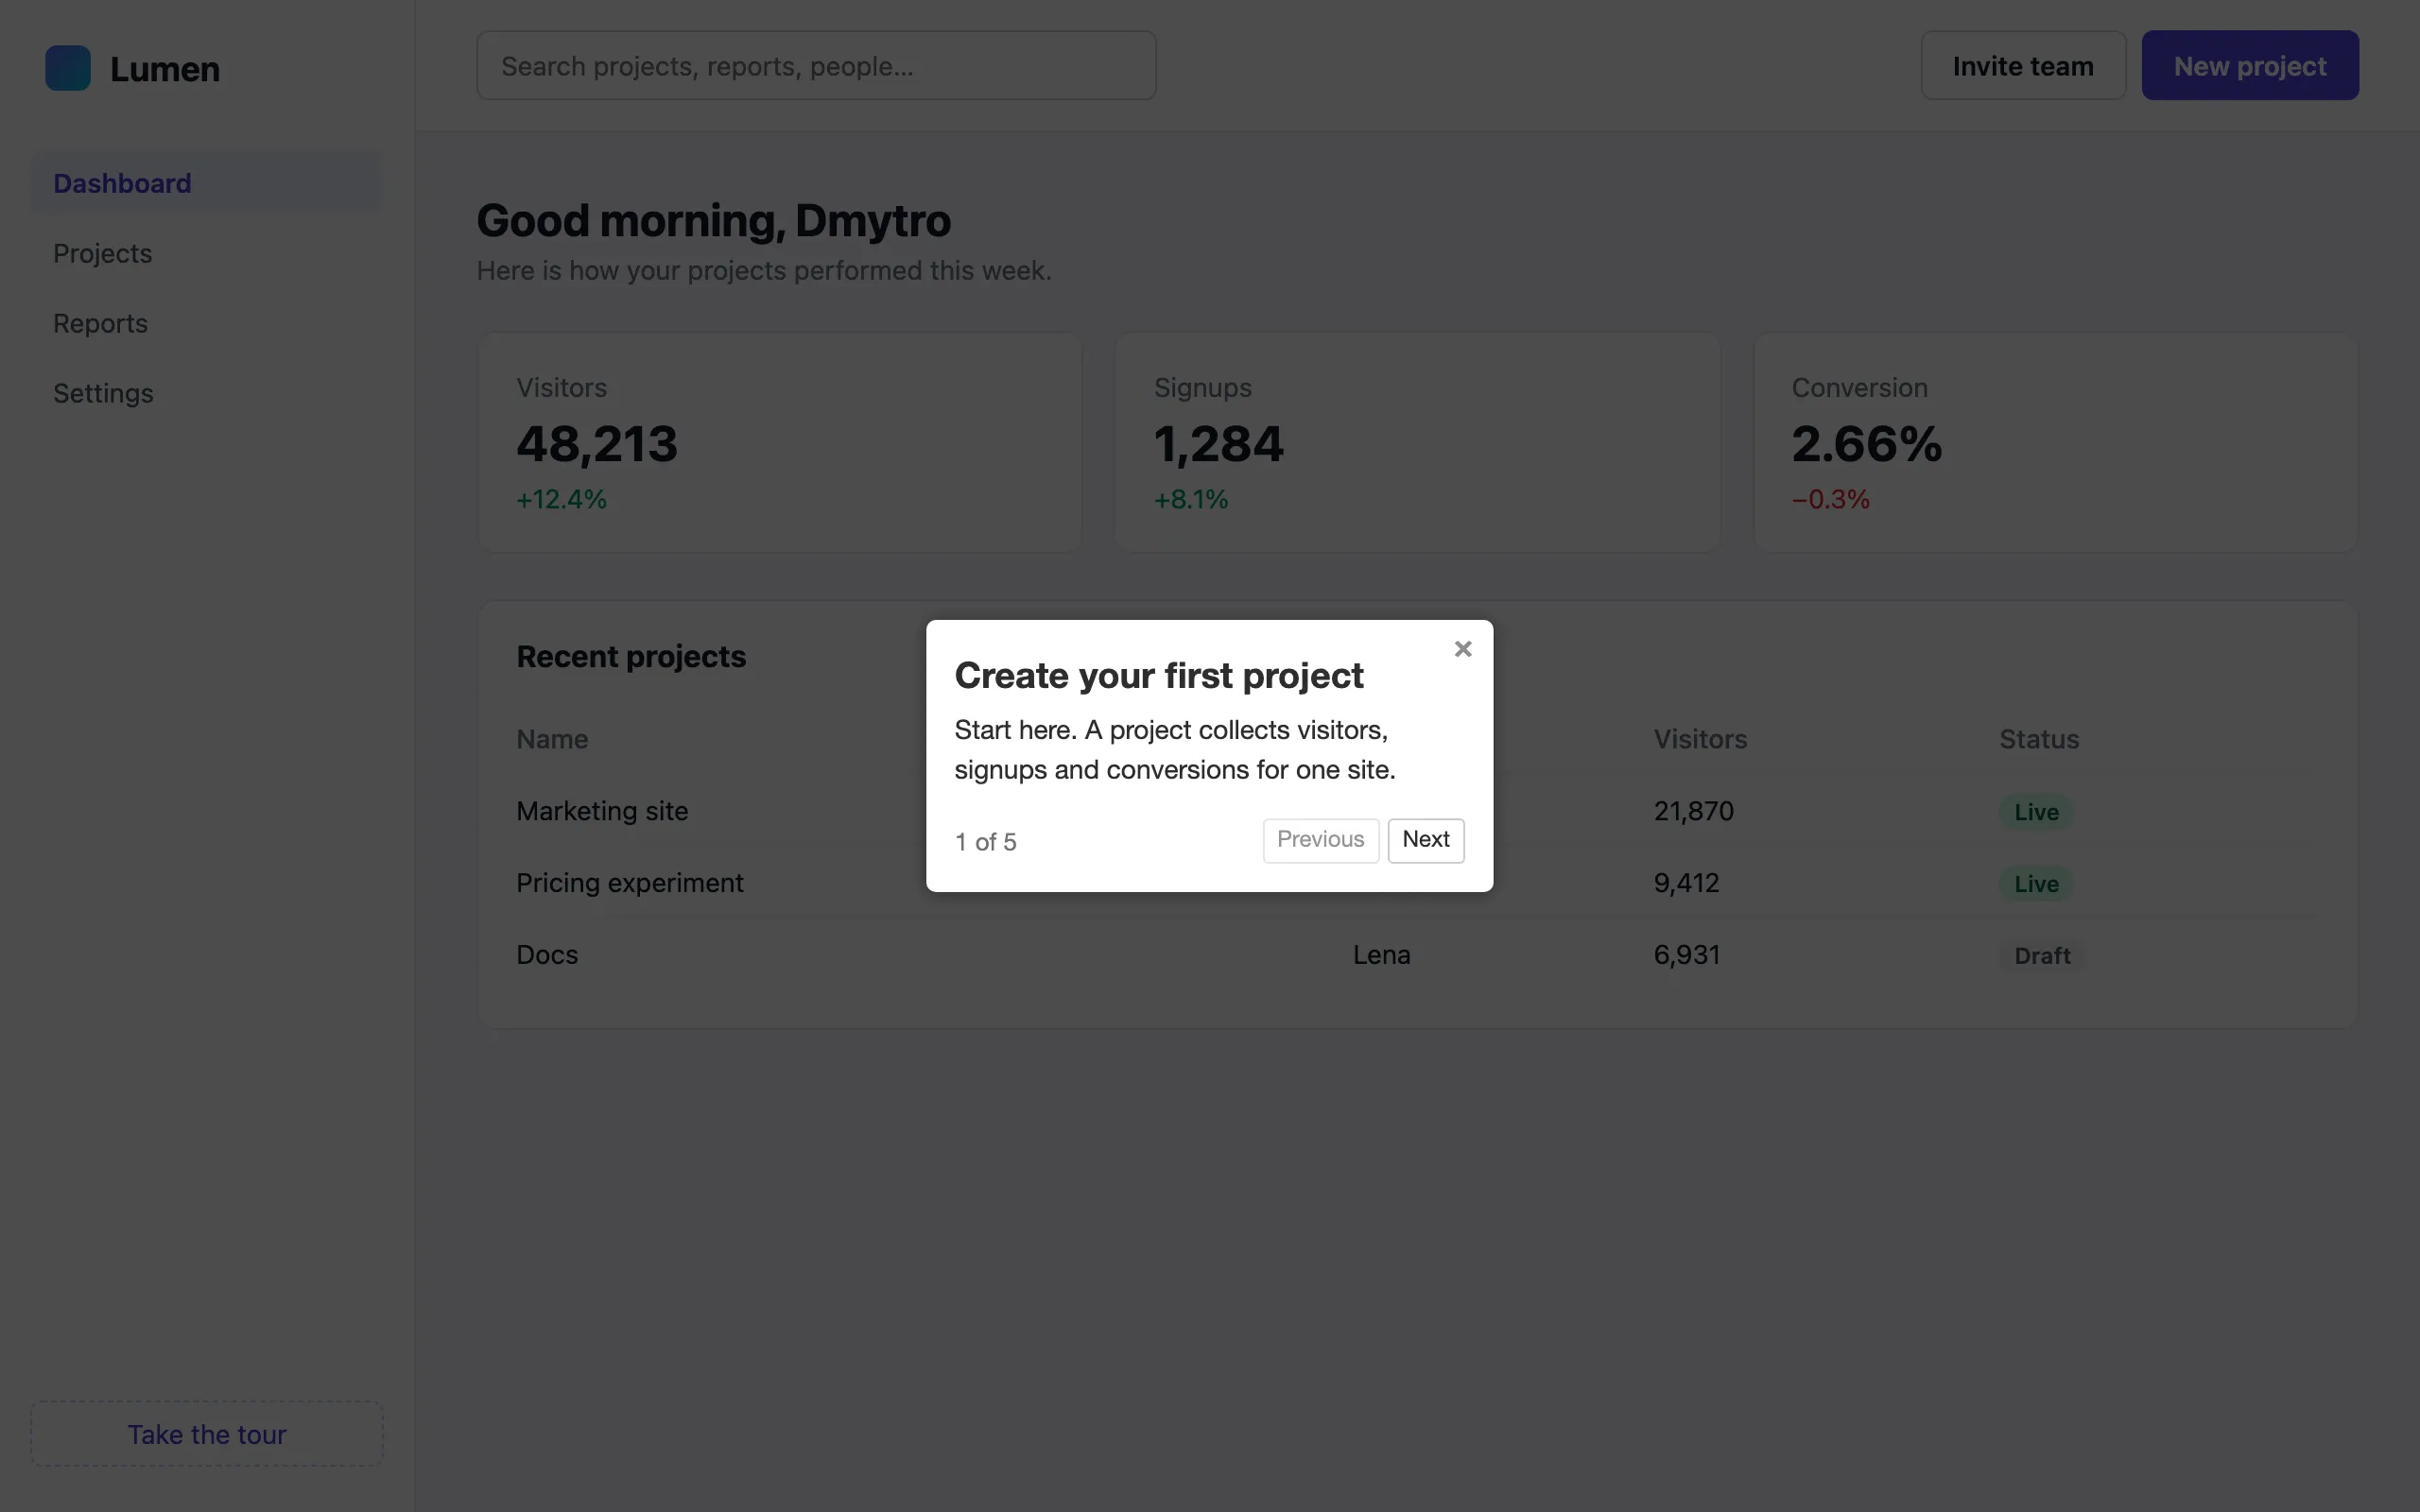
The user sees “Create your first project” with no idea where to click. The step 1 test fails before it even takes a screenshot, and the message says exactly what is wrong:
Error: "#new-project" must match one element
expect(locator).toHaveCount(expected) failed
Locator: locator('#new-project')Expected: 1Received: 0You don’t need screenshots to catch this one. A selector check is enough, and it’s the cheapest test you can add to any tour.
Break 2: a sticky header covers the tour
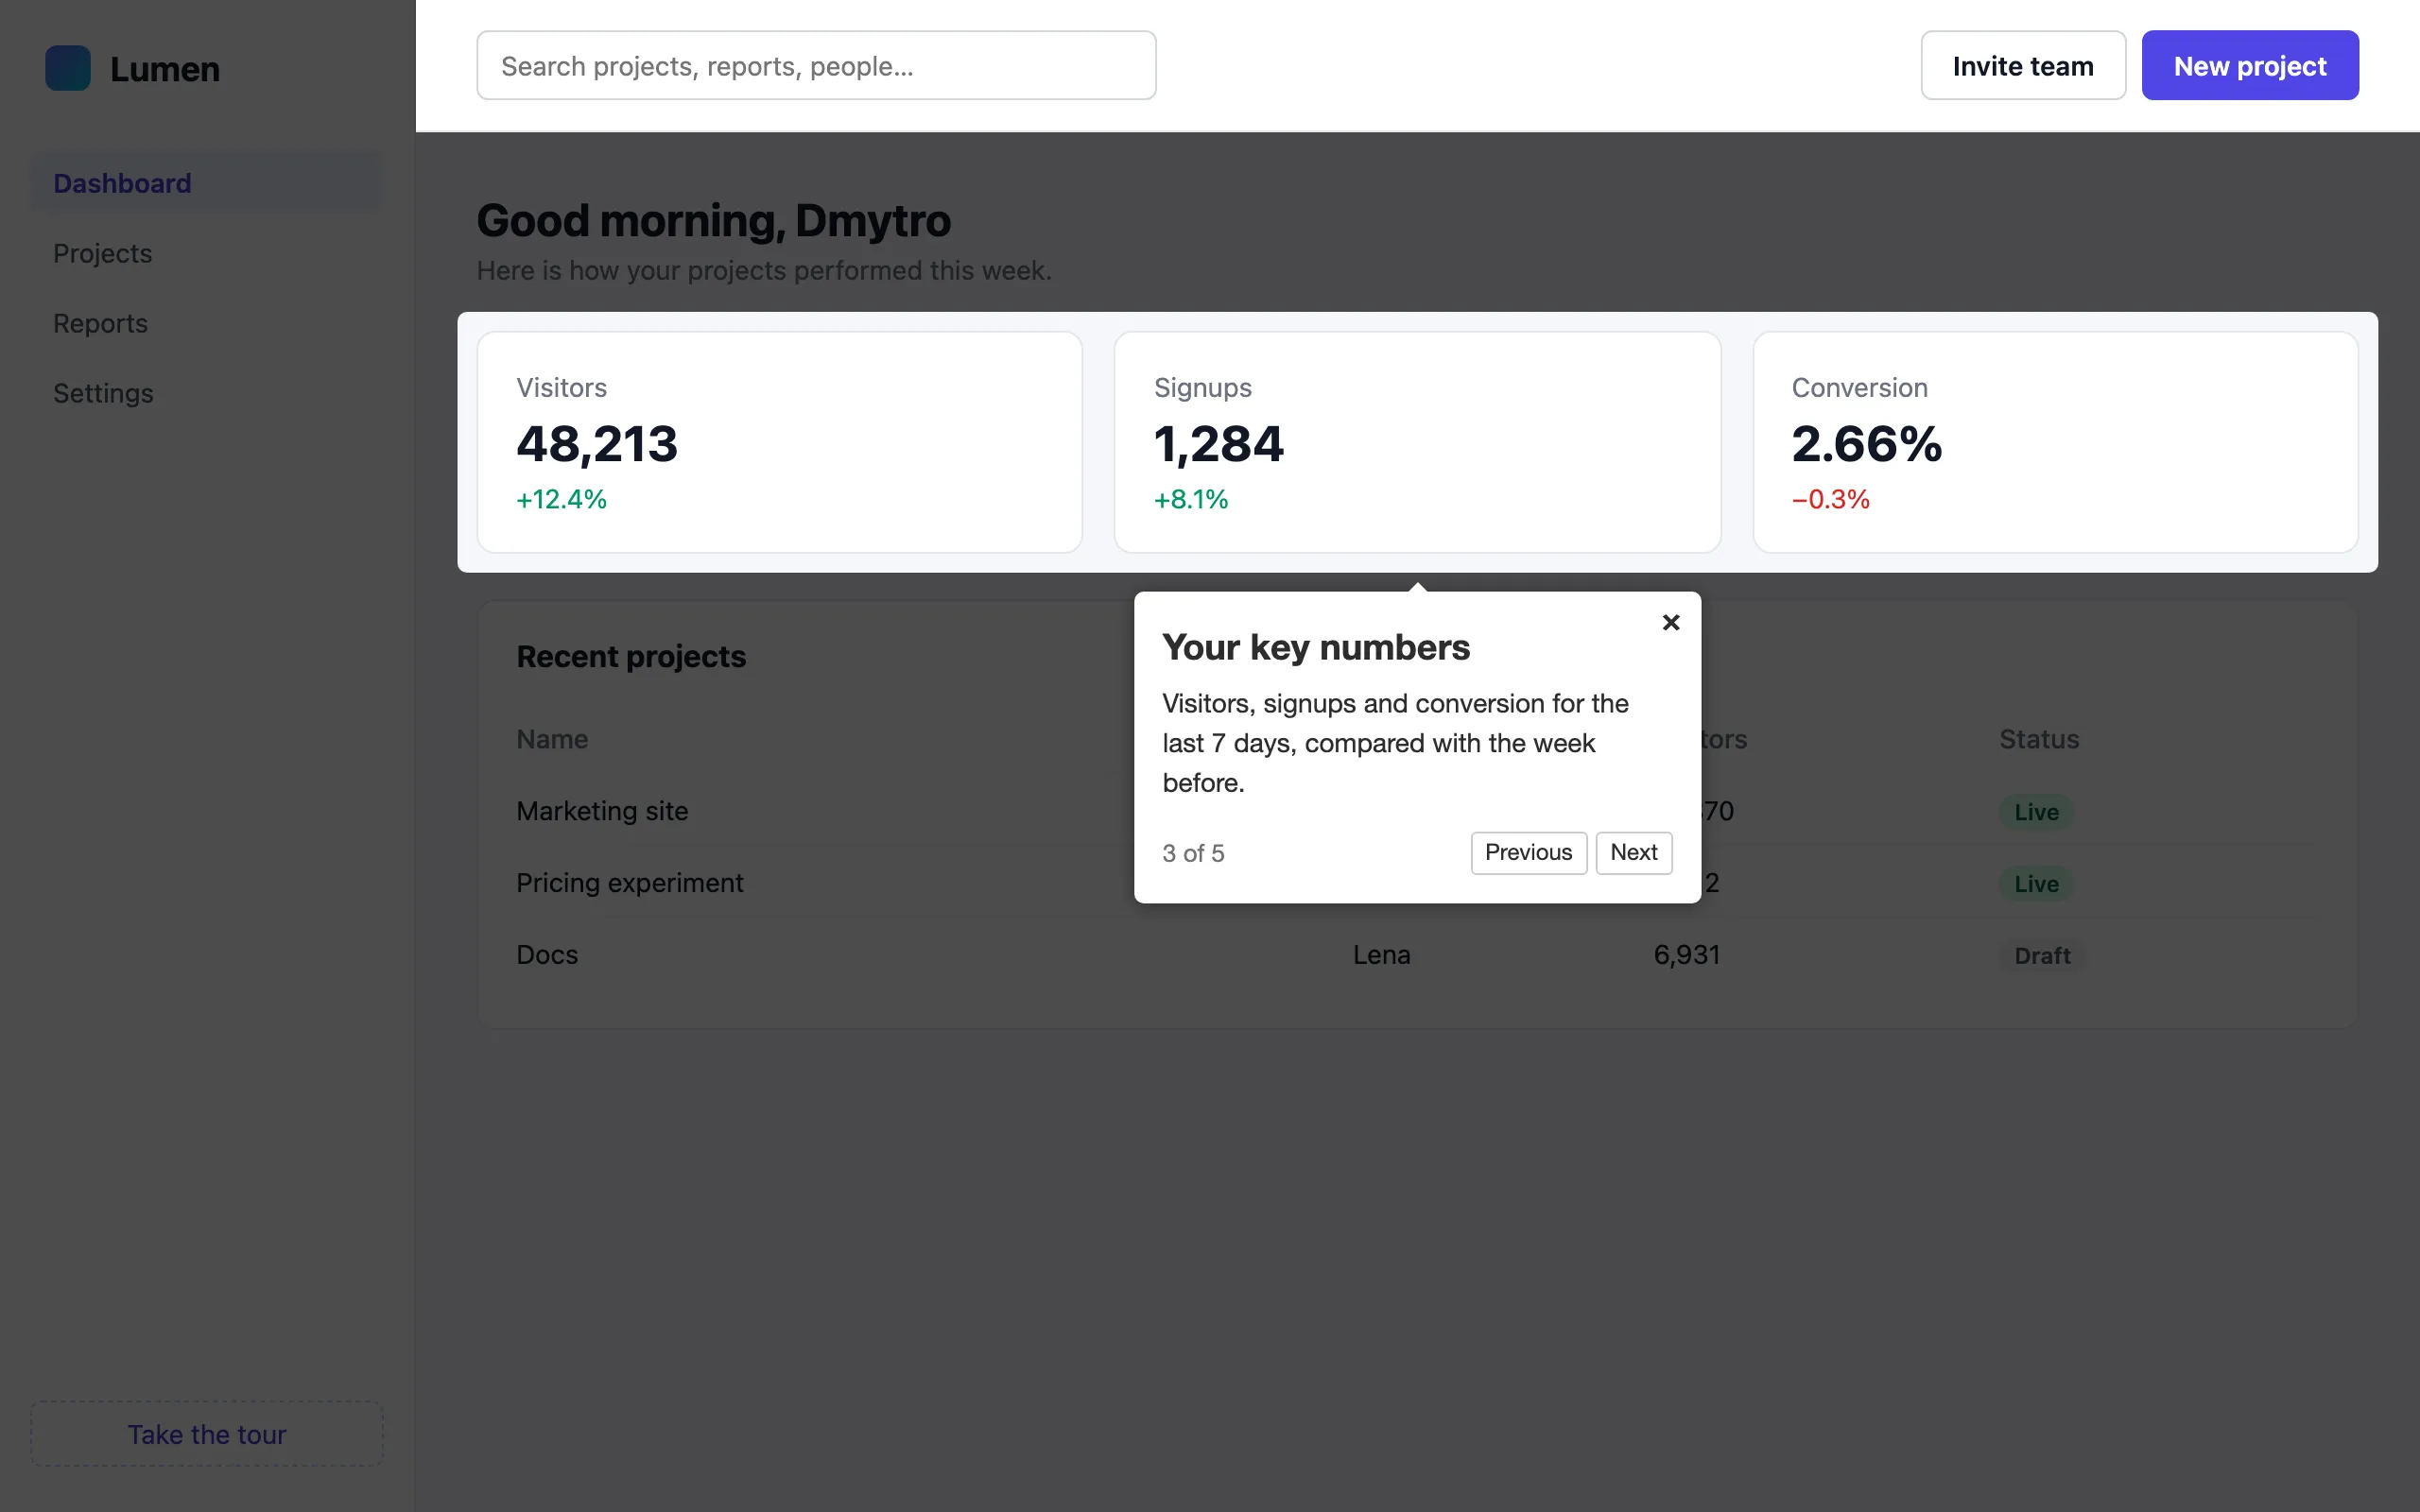
The second change is the reason I wanted screenshots. A developer makes the top bar sticky and gives it a high z-index, so dropdowns don’t slide under it:
.topbar { position: sticky; top: 0; z-index: 100000;}Every selector still exists and every popover still opens. The click-through test passes. But the header now sits above the Driver.js overlay, so it stays bright while the rest of the page is dimmed:
All five screenshot tests failed:
✘ 1 [desktop] › tests/tour.spec.ts:22:5 › step 1: Create your first project (665ms) ✘ 2 [desktop] › tests/tour.spec.ts:22:5 › step 2: Find anything (565ms) ✘ 3 [desktop] › tests/tour.spec.ts:22:5 › step 3: Your key numbers (568ms) ✘ 4 [desktop] › tests/tour.spec.ts:22:5 › step 4: Share reports (544ms) ✘ 5 [desktop] › tests/tour.spec.ts:22:5 › step 5: Invite your team (568ms) ✓ 6 [desktop] › tests/tour.spec.ts:40:1 › the tour can be completed with the Next button (380ms)
291852 pixels (ratio 0.08 of all image pixels) are different.Playwright saves a diff image for every failure. Open it with npx playwright show-report. The changed pixels are red, and here it’s the whole header:
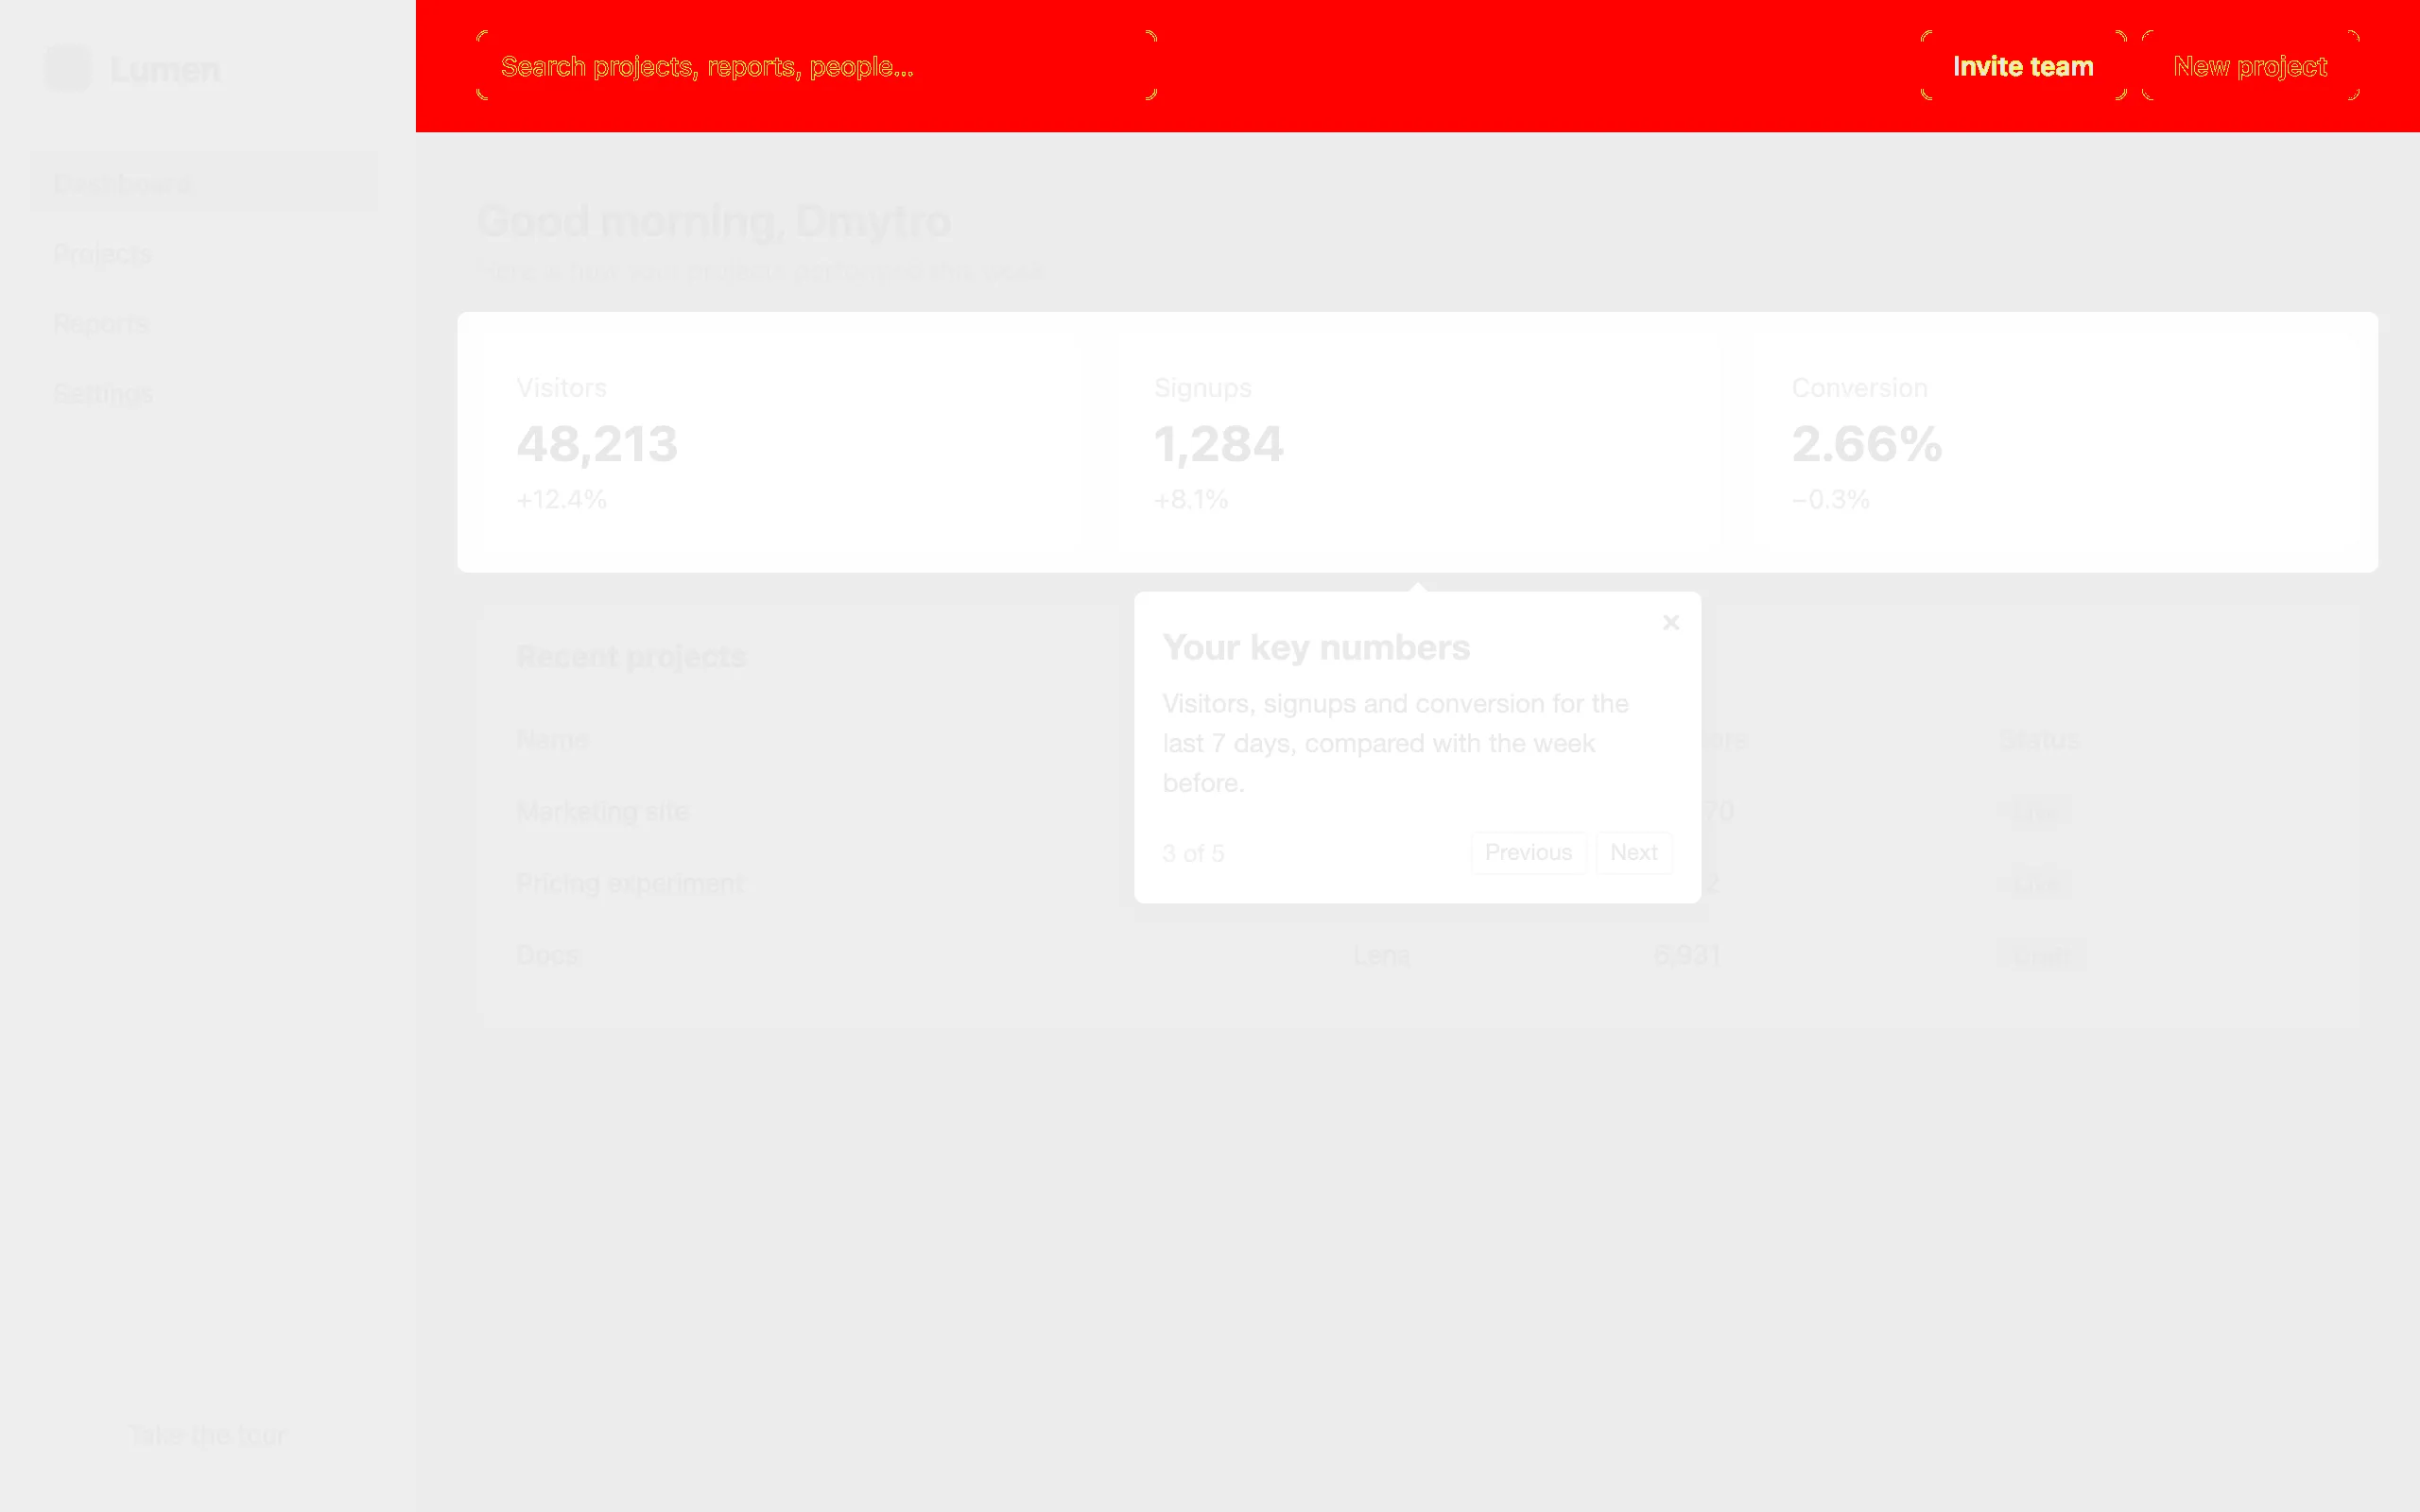
This is the kind of bug a functional test can’t see. Nothing is missing or broken in the DOM. It only looks wrong.
How I keep the screenshot tests stable
Screenshot tests have a reputation for failing for no reason. These settings kept mine stable:
- Turn off animations. I pass
{ animate: false }to Driver.js and setanimations: "disabled"in the config. Otherwise the screenshot can catch the popover halfway through its fade-in. - Allow a tiny difference.
maxDiffPixelRatio: 0.01ignores anti-aliasing noise. The sticky header changed 8% of the pixels, far above that limit. - Use one viewport per project. Tours often change sides on smaller screens. If you support mobile, add a second Playwright project with a phone viewport and give it its own baselines.
- Hide data that changes. My demo has fixed numbers. In a real app, pass
mask: [page.locator(".stat-value")]totoHaveScreenshot()so live stats don’t fail the tests. - Make baselines for the OS your CI uses. Fonts render differently on macOS and Linux, which is why the baseline names include the OS. My baselines are from macOS, so for Linux CI I make the
-linuxbaselines in the official Playwright Docker image and run the tests in the same image:
docker run --rm -v "$(pwd)":/work -w /work mcr.microsoft.com/playwright:v1.65.0-noble \ sh -c "npm ci && npx playwright test --update-snapshots"When you change the tour on purpose, run npx playwright test --update-snapshots, look at the new images and commit them with the change. The review in the pull request then shows exactly how the tour changed.
Render the tour steps with ScreenshotOne
The Playwright tests protect the tour in CI. Sometimes I also need the images outside the tests: to show a new tour in a pull request, to put the steps in the docs, or to check how the tour looks on staging without installing browsers anywhere.
For that, I use the ScreenshotOne API. The render-with-screenshotone.ts script in the repository renders every step with the same startTour() hook the tests use:
for (const [index, step] of tour.steps.entries()) { const response = await fetch("https://api.screenshotone.com/take", { method: "POST", headers: { "Content-Type": "application/json", "X-Access-Key": accessKey, }, body: JSON.stringify({ ...page, // Wait until Driver.js and the app's scripts have loaded. wait_until: ["load"], // Start the tour at this step, the same hook the Playwright tests use. scripts: `window.startTour(${index}, { animate: false });`, // The scripts run first, then the API waits for the popover. wait_for_selector: ".driver-popover", viewport_width: 1280, viewport_height: 800, device_scale_factor: 2, format: "png", block_cookie_banners: true, block_chats: true, cache: false, }), });
if (!response.ok) { const error: { error_code?: string; error_message?: string } = await response.json().catch(() => ({})); throw new Error(`Step ${index + 1} failed with ${response.status}: ${error.error_code} ${error.error_message}`); }
await writeFile(`screenshots/step-${index + 1}.png`, Buffer.from(await response.arrayBuffer()));}A few details matter here:
wait_untilset toloadmakes the API wait for Driver.js and the app’s scripts. My first run didn’t have it: with HTML input, the script ran while the page was still loading,window.startTourdidn’t exist yet, and every request timed out waiting for the popover.scriptsruns JavaScript on the page after it loads. Here it starts the tour at the right step.wait_for_selectorwaits until the popover exists, so the screenshot never catches the page before the tour opens.block_cookie_bannersandblock_chatskeep consent banners and chat widgets from covering the tour on a real site.pageis either{ url }or{ html }. For a deployed app, setTOUR_URLto your staging URL. The API can’t reachlocalhost, so for the demo the script inlines the app’s CSS, compiled JavaScript and tour config into one HTML document and loads Driver.js from a CDN. That’s wherewindow.TOUR_CONFIGcomes from.
Run it with your access key:
SCREENSHOTONE_ACCESS_KEY=<your access key> npm run renderSCREENSHOTONE_ACCESS_KEY=<your access key> TOUR_URL=https://staging.example.com/ npm run renderAll five steps took about 11 seconds. With device_scale_factor: 2, each image is 2560 × 1600, sharp enough for docs and pull requests. Here is step 3 as the API rendered it:
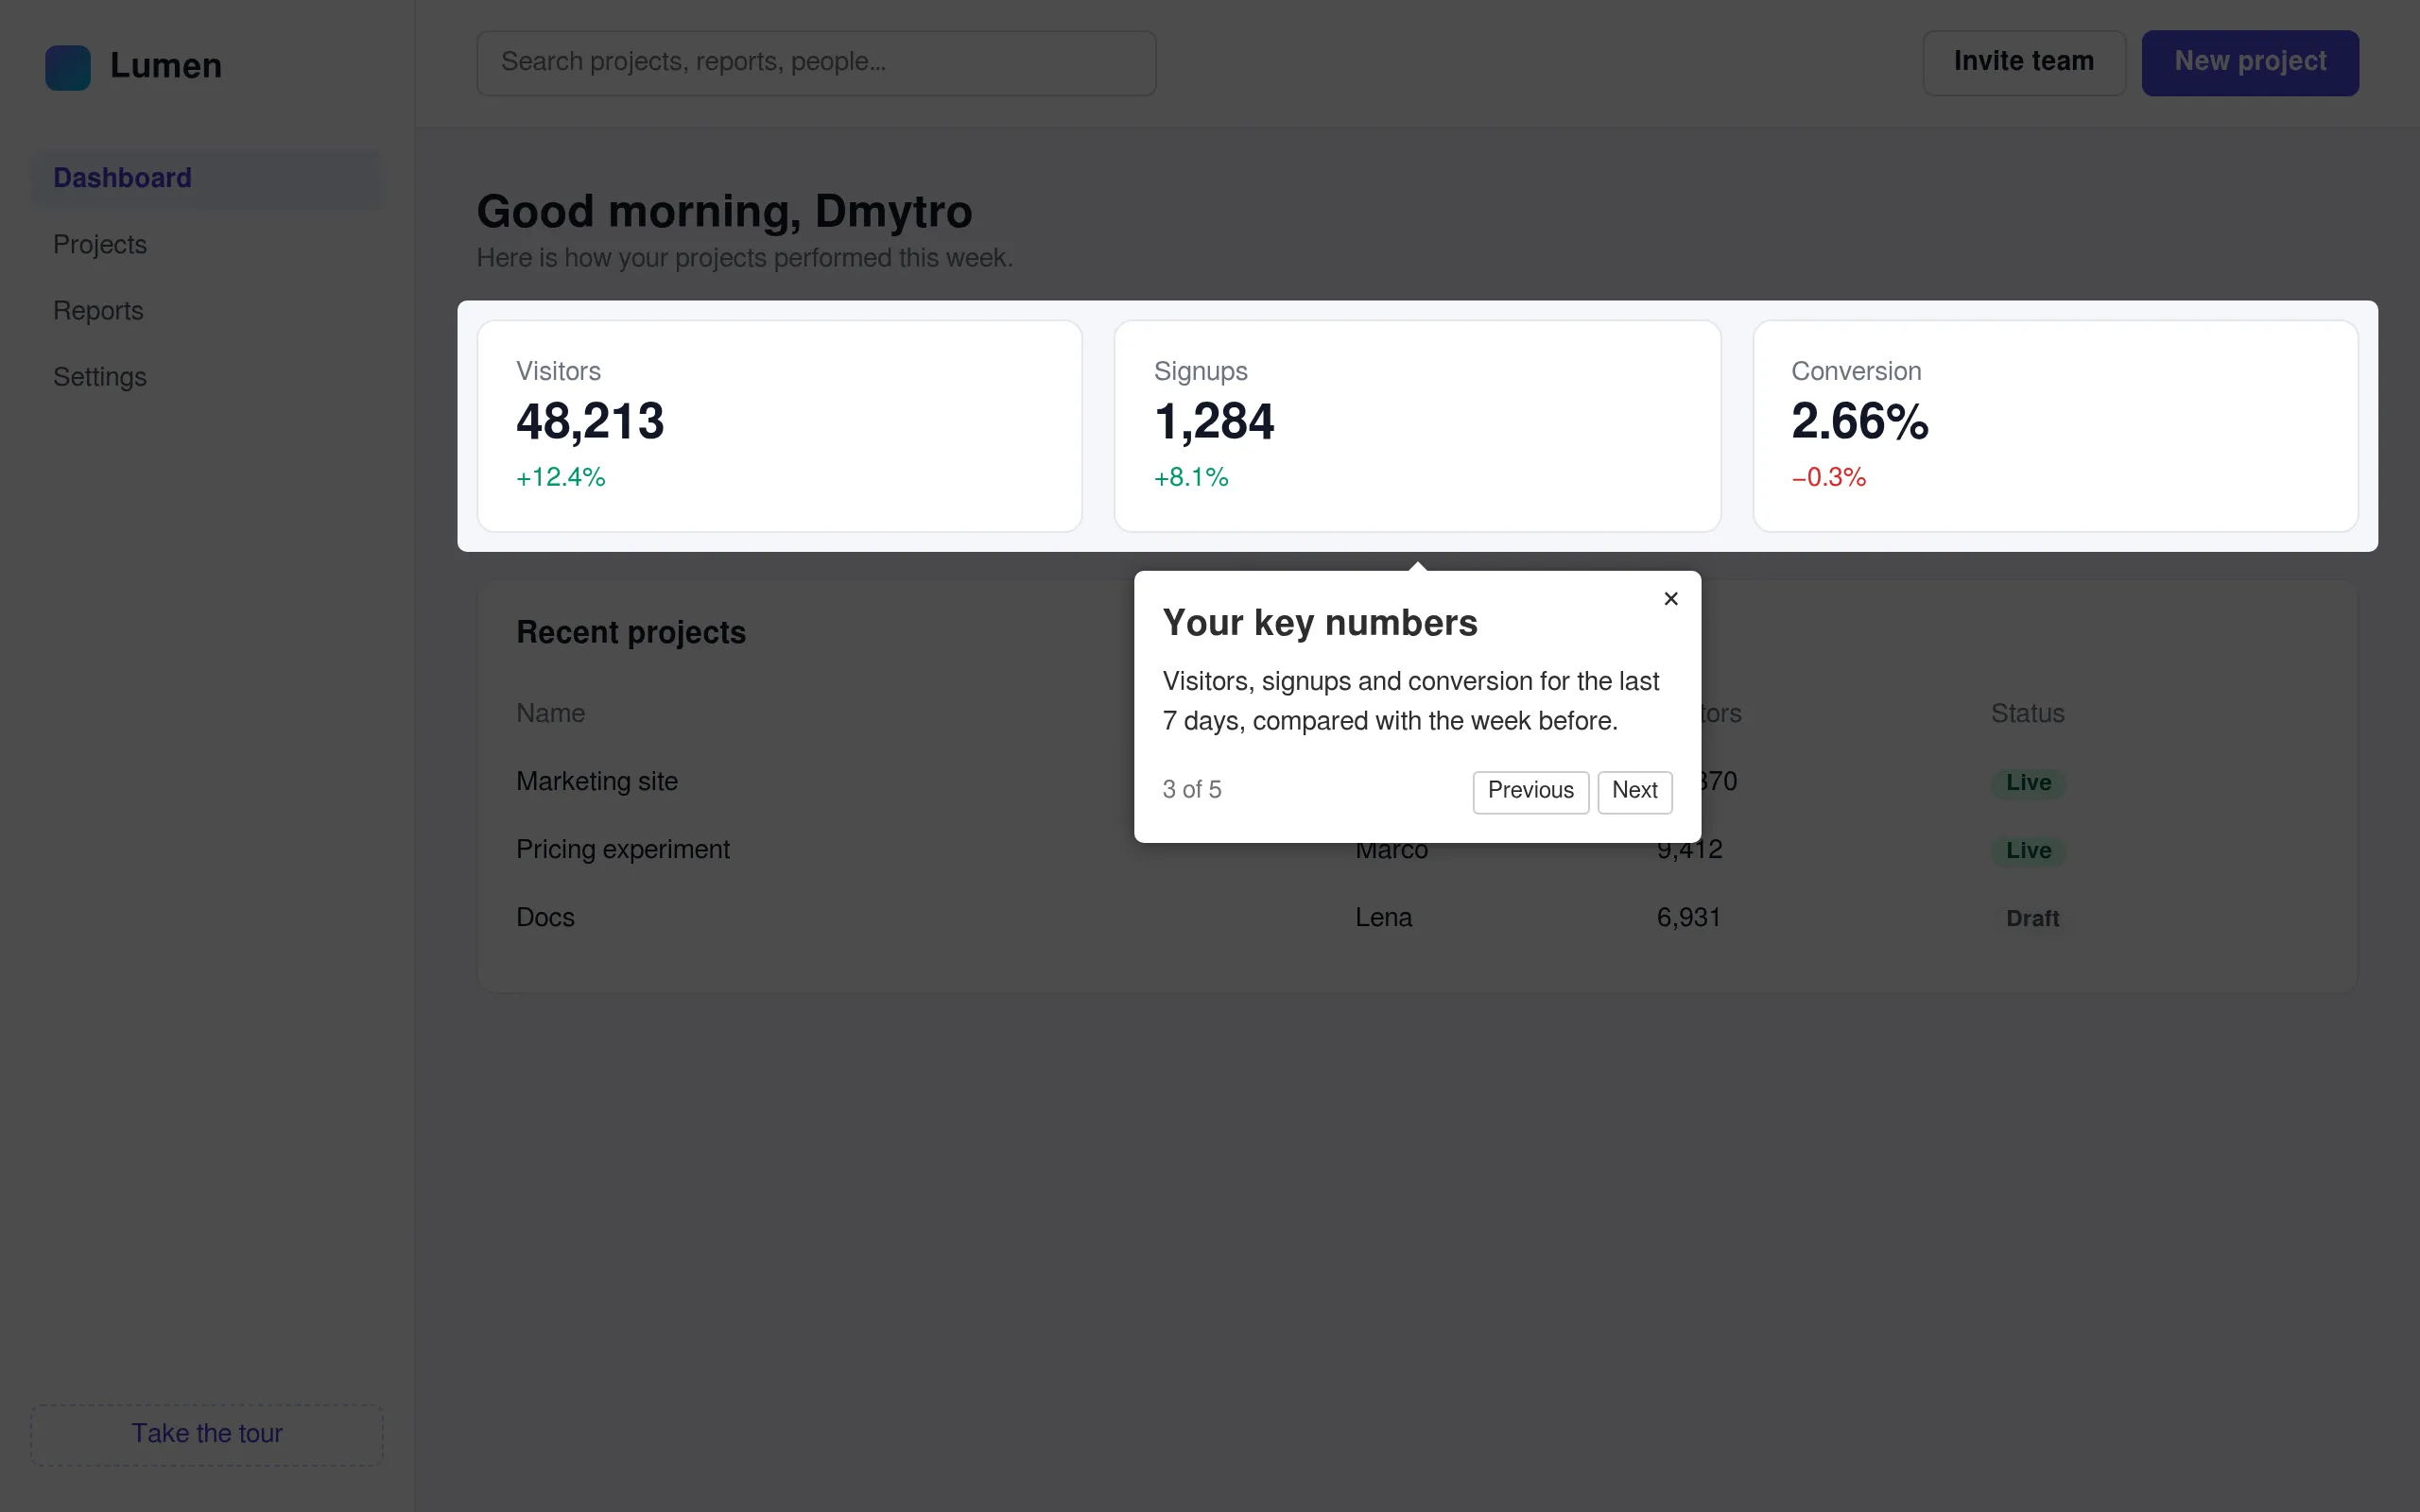
The fonts differ slightly from my macOS screenshots because the API renders on Linux. That’s also why I don’t use these images as Playwright baselines: compare screenshots made in the same environment.
If your tour only shows up for logged-in users, pass a session with the cookies option.
Summary
A product tour is UI like any other, but it breaks in ways normal tests don’t notice. What worked for me:
- Keep the tour in a JSON file, so the app and the tests read the same steps.
- Expose a
startTour(step)hook, so a test can open any step directly. - Check that every selector matches one visible element. It catches renamed and removed targets.
- Compare a screenshot of every step with
toHaveScreenshot(). It catches the bugs you can only see, like a header covering the overlay.
The full example, with the app, the tests, the baselines and the ScreenshotOne script, is in screenshotone/blog-examples. If you’re new to Playwright screenshots, start with how to render screenshots with Playwright and how to wait for a page to load before a screenshot.
Frequently Asked Questions
If you read the article, but still have questions. Please, check the most frequently asked. And if you still have questions, feel free reach out at support@screenshotone.com.
How do I test a product tour with Playwright?
Start the tour at each step from the test, check that the step's target element exists and is visible, and compare a screenshot of the page with a baseline using expect(page).toHaveScreenshot(). Add one test that clicks through the whole tour with the Next button.
Why did my Driver.js tour show the popover in the middle of the screen?
Driver.js couldn't find the step's element, usually because its selector changed. It then shows the popover in the center without highlighting anything and doesn't throw an error. Check that every step's selector matches one visible element in your tests.
Why do Playwright screenshot tests fail on CI but pass on my machine?
Fonts and anti-aliasing differ between operating systems, so Playwright stores baselines per platform. Generate Linux baselines in the official Playwright Docker image and use the same image on CI.