DXcam is built specifically for high-performance screen capture on Windows. It uses the DirectX Desktop Duplication API to achieve capture speeds that other libraries can’t match. If you search for a cross-platform alternative, it is Python MSS.

At the moment of publishing the guide, the library was last updated in 2023. In case you are going to use desktop screen capture for production-ready projects, check out our guide on Python MSS, it is still actively maintained.
If because of any reason you decide to use DXcam or because of its specific features, continue reading the guide.
Installation and Basic Usage
Install the library using pip:
pip install dxcamThen run the following code to capture a single frame to test the library works:
import dxcam
# Create a cameracamera = dxcam.create()
# Capture a single frameframe = camera.grab()
if frame is not None: print(f"Captured frame: {frame.shape}")The returned frame is a NumPy array ready for processing.
Saving Screenshots
import dxcamimport cv2
camera = dxcam.create(output_color="BGR") # BGR for OpenCVframe = camera.grab()
if frame is not None: cv2.imwrite('screenshot.png', frame)Or with PIL:
import dxcamfrom PIL import Image
camera = dxcam.create(output_color="RGB")frame = camera.grab()
if frame is not None: img = Image.fromarray(frame) img.save('screenshot.png')Video Mode (Continuous Capture)
For high-FPS continuous capture:
import dxcamimport time
camera = dxcam.create()camera.start(target_fps=60)
# Capture for 5 secondsframes = []start = time.time()
while time.time() - start < 5: frame = camera.get_latest_frame() if frame is not None: frames.append(frame.copy())
camera.stop()
print(f"Captured {len(frames)} frames in 5 seconds")print(f"Effective FPS: {len(frames) / 5:.1f}")Capture Specific Region
import dxcam
camera = dxcam.create()
# Region: (left, top, right, bottom)frame = camera.grab(region=(0, 0, 500, 500))
if frame is not None: print(f"Region shape: {frame.shape}")Capture Specific Monitor
import dxcam
# List available devicesdevices = dxcam.device_info()print("Available devices:", devices)
# Create camera for specific output (monitor)camera = dxcam.create(output_idx=0) # First monitor# camera = dxcam.create(output_idx=1) # Second monitorLower Resolution Capture
For faster processing, capture at lower resolution:
import dxcam
# Standard capturecamera = dxcam.create()frame = camera.grab()print(f"Full resolution: {frame.shape}")
# Capture region at lower resolutionregion = (0, 0, 960, 540) # Half of 1920x1080frame = camera.grab(region=region)print(f"Lower resolution: {frame.shape}")Output Color Formats
import dxcam
# RGB format (default)camera_rgb = dxcam.create(output_color="RGB")
# BGR format (for OpenCV)camera_bgr = dxcam.create(output_color="BGR")
# BGRA format (with alpha channel)camera_bgra = dxcam.create(output_color="BGRA")Performance Benchmarking
import dxcamimport time
camera = dxcam.create()
# Single frame benchmarkstart = time.time()for _ in range(100): camera.grab()elapsed = time.time() - startprint(f"Single grab FPS: {100 / elapsed:.1f}")
# Video mode benchmarkcamera.start(target_fps=240)time.sleep(2)
frames_captured = 0start = time.time()while time.time() - start < 5: frame = camera.get_latest_frame() if frame is not None: frames_captured += 1
camera.stop()print(f"Video mode FPS: {frames_captured / 5:.1f}")Typical results on a modern system: 240+ FPS
Full Screen Recording Example
import dxcamimport cv2import timefrom collections import deque
def record_screen(duration=5, fps=30, output='recording.mp4'): camera = dxcam.create(output_color="BGR")
# Get first frame to determine dimensions first_frame = camera.grab() height, width = first_frame.shape[:2]
# Set up video writer fourcc = cv2.VideoWriter_fourcc(*'mp4v') out = cv2.VideoWriter(output, fourcc, fps, (width, height))
# Start capture camera.start(target_fps=fps)
start = time.time() frames_written = 0
while time.time() - start < duration: frame = camera.get_latest_frame() if frame is not None: out.write(frame) frames_written += 1
camera.stop() out.release()
print(f"Recorded {frames_written} frames to {output}")
record_screen(duration=5, fps=30)Real-Time Processing Example
import dxcamimport cv2
def live_preview(): """Display live screen capture with FPS counter.""" camera = dxcam.create(output_color="BGR") camera.start(target_fps=60)
frame_count = 0 start_time = cv2.getTickCount()
while True: frame = camera.get_latest_frame() if frame is None: continue
# Calculate FPS frame_count += 1 elapsed = (cv2.getTickCount() - start_time) / cv2.getTickFrequency() fps = frame_count / elapsed
# Add FPS text cv2.putText(frame, f'FPS: {fps:.1f}', (10, 30), cv2.FONT_HERSHEY_SIMPLEX, 1, (0, 255, 0), 2)
# Display (resize for preview) preview = cv2.resize(frame, (960, 540)) cv2.imshow('Screen Capture', preview)
if cv2.waitKey(1) & 0xFF == ord('q'): break
camera.stop() cv2.destroyAllWindows()
live_preview()Common Issues
No Frame Returned
import dxcam
camera = dxcam.create()frame = camera.grab()
if frame is None: print("No frame captured - screen might not have changed") # dxcam only captures when screen changes # Use video mode for continuous captureMultiple Cameras
import dxcam
# Only one camera per output at a timecamera1 = dxcam.create(output_idx=0)
# This will fail:# camera2 = dxcam.create(output_idx=0) # Error!
# Delete first camera before creating another for same outputdel camera1camera2 = dxcam.create(output_idx=0) # OKWhen to Use DXcam
Use DXcam when:
- You need maximum FPS (gaming, streaming).
- You’re on Windows.
- Real-time processing is required.
- You don’t need cross-platform support and don’t care about the maintenance of the library.
Use Python MSS when:
- You need cross-platform support.
- 30-60 FPS is sufficient.
- Simpler API is preferred.
- And you want to rely on a maintained library.
In case you need to render website screenshots, check out our guide on websites screenshots with Python. The guide only consider website screenshot automation.
DXcam vs Python MSS Performance
In general:
| Metric | DXcam | Python MSS |
|---|---|---|
| Max FPS (1080p) | 240+ | 30-60 |
| Platform | Windows only | Cross-platform |
| API | NumPy native | Custom format |
| Best for | Gaming/streaming | General purpose |
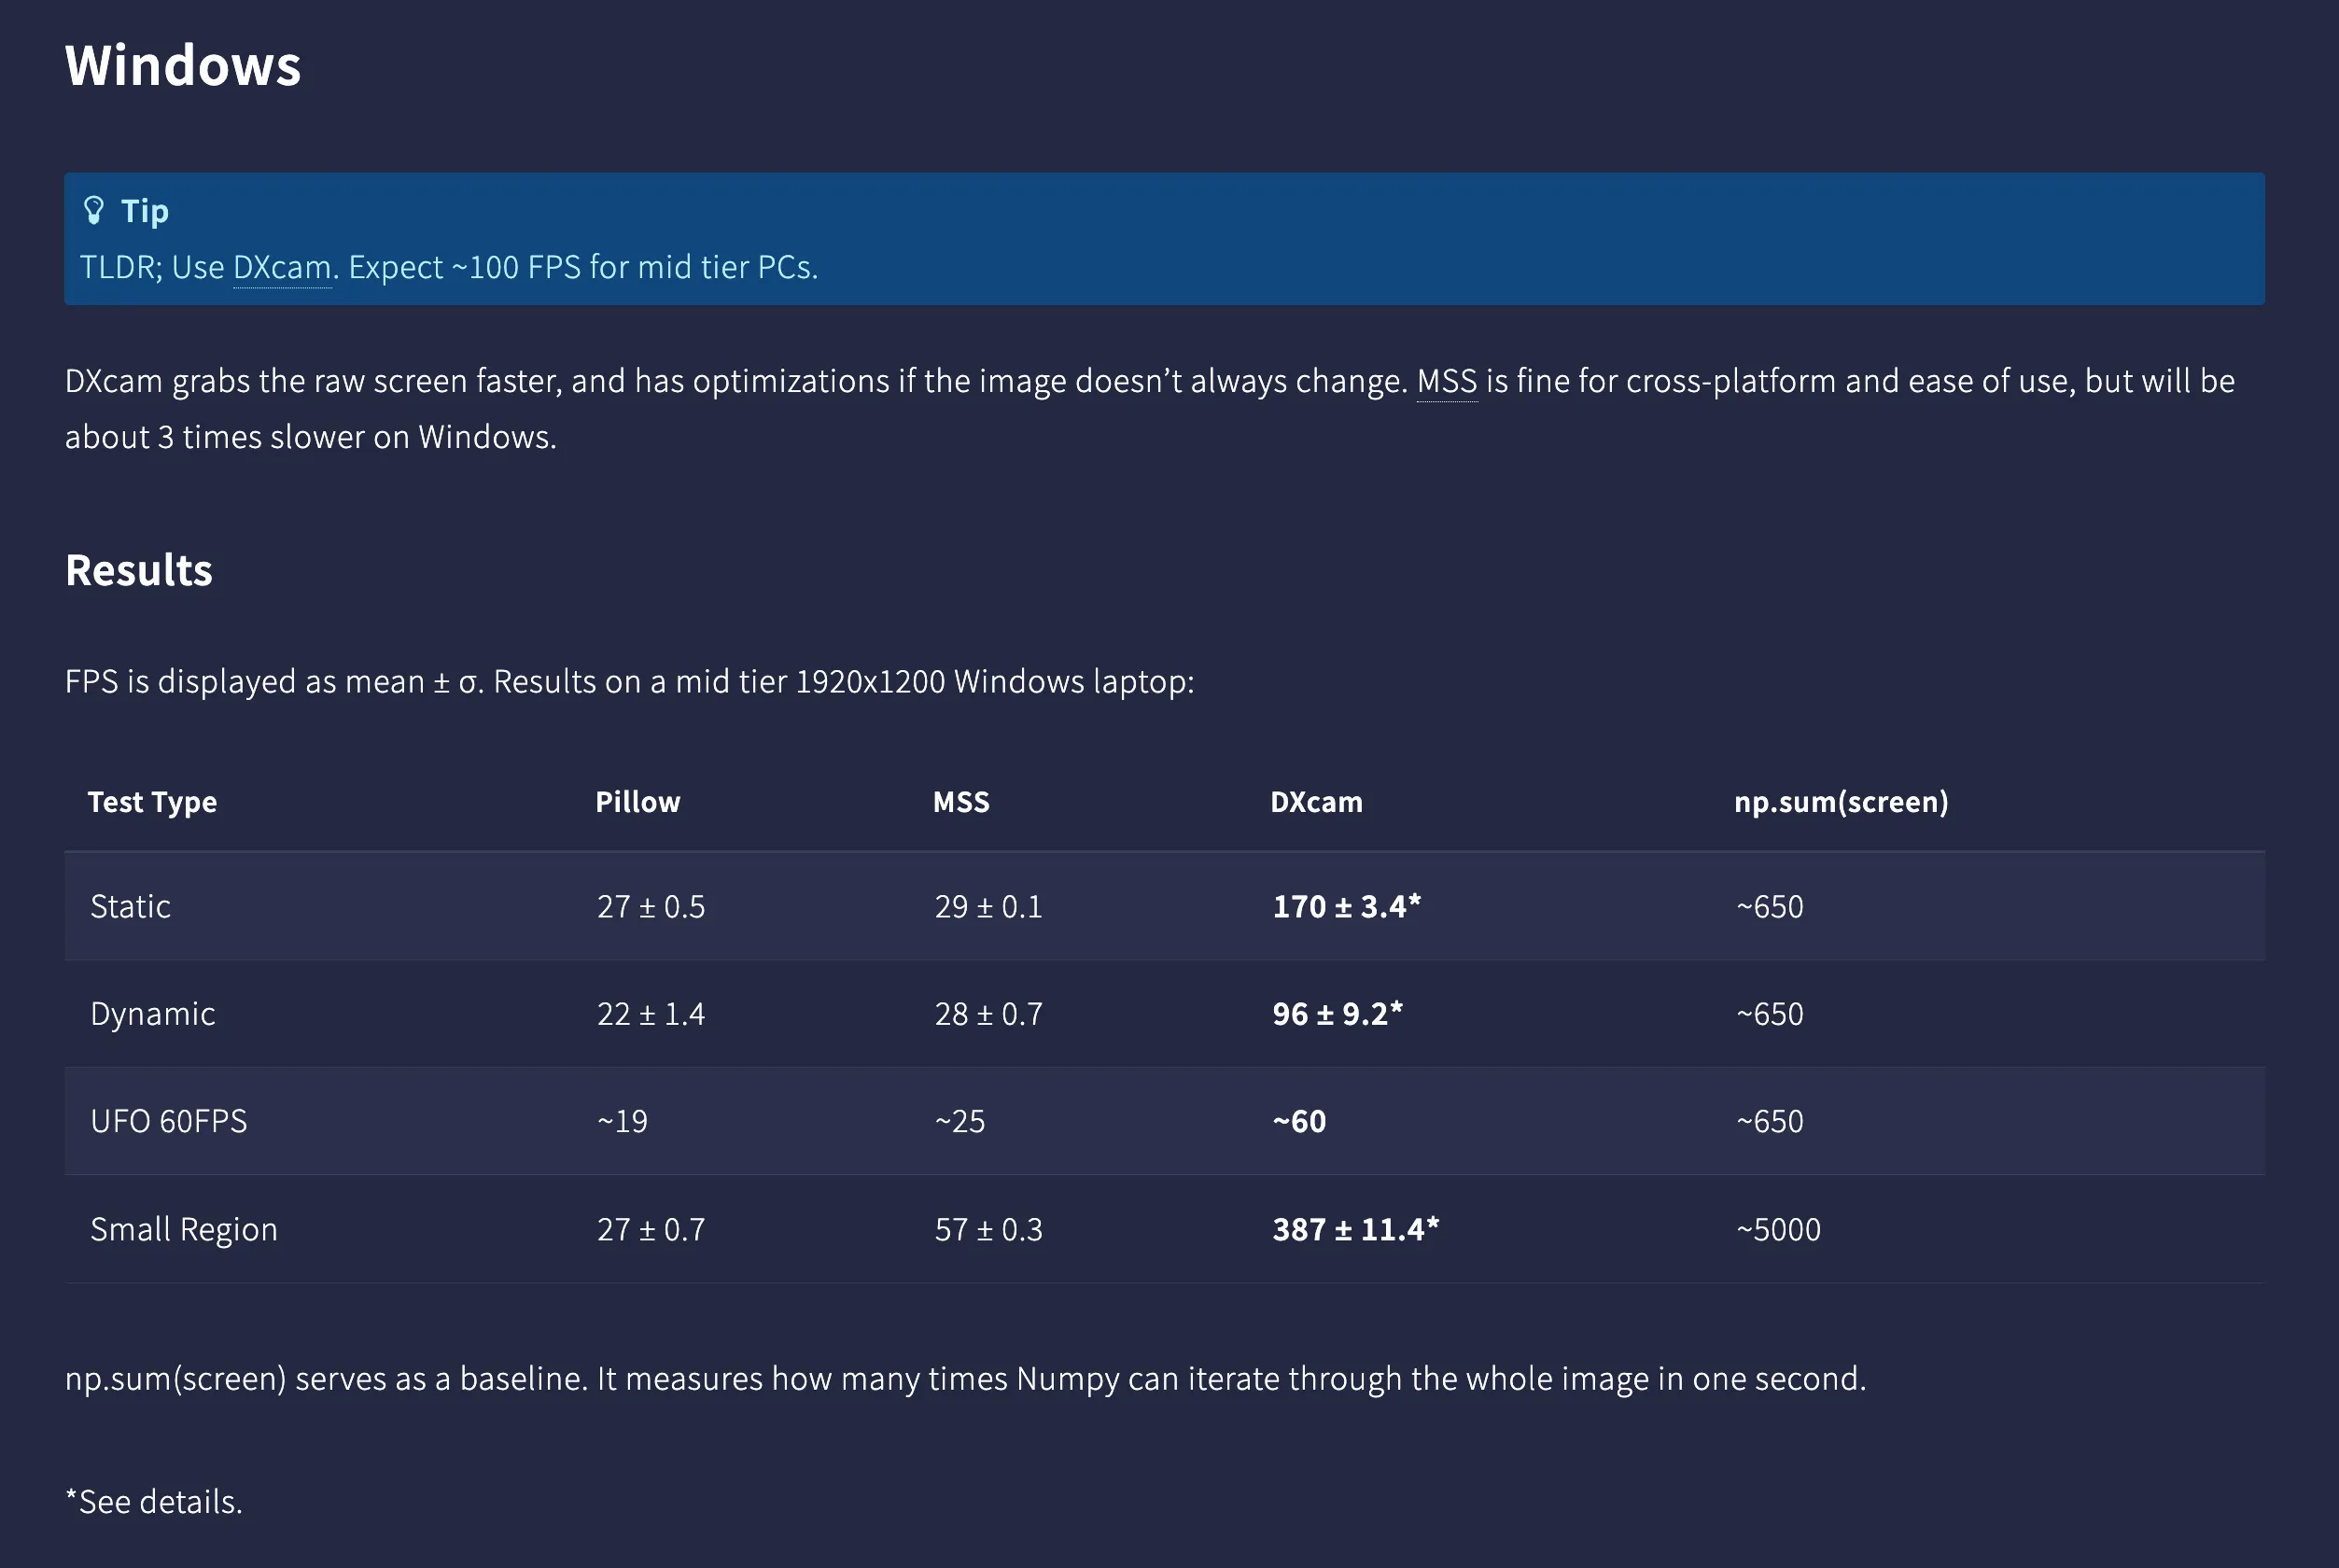
Kyle Fu also confirms in his performance comparison that DXcam is faster than Python MSS:
Summary
DXcam might be the fastest screen capture option for Python on Windows, but it is not actively maintained at the moment of writing the guide, however:
- It might achieve 240+ FPS capture using DirectX.
- Supports Video mode for continuous capture.
- Native NumPy output.
- Region and multi-monitor support.
For cross-platform needs, use Python MSS. For website screenshots, check out our website screenshot automation guide with Python.
Frequently Asked Questions
If you read the article, but still have questions. Please, check the most frequently asked. And if you still have questions, feel free reach out at support@screenshotone.com.
Is DXcam fast for screen capture?
Yes, DXcam is the fastest Python screen capture library, achieving 240+ FPS on modern systems. It uses DirectX Desktop Duplication API for maximum performance.
What is the difference between DXcam and Python MSS?
DXcam is faster (240+ FPS vs 30-60 FPS) but only works on Windows. Python MSS is cross-platform but slower. Use DXcam for gaming/streaming on Windows, Python MSS for cross-platform needs.
Is Windows Graphics Capture faster than DXcam?
They're comparable in performance. DXcam uses Desktop Duplication API and is easier to use in Python. Windows.Graphics.Capture requires more setup but offers some additional features.